Using a custom component and the model property, we'll explore how you can easily interact with IoT devices using Kendo UI Builder.
In this next blog in my Kendo UI Builder how-to series, we are going to study a sample custom component that interacts with another component on the page via the model property. Specifically, the component will display a metric from an IoT device in a room. The data from the various rooms and devices is obtained via a REST data provider.
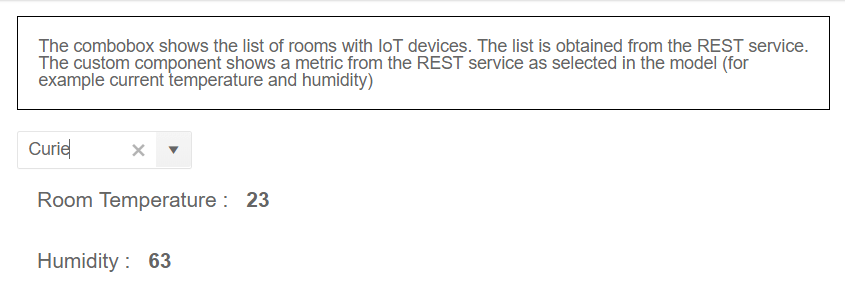
We will use two instances of this component on a blank view to show the temperature and the humidity in the room. The room is selected from a combobox component on the same view.
The view containing the combobox and the two custom components looks like this:

This sample component builds up from the basic component sample that I introduced earlier in the series. If you are not familiar with it, you can read more about it here.
To follow along, download the template samples zip from github or clone the repository; then open the folder components/custom-device-metrics-comp and follow the same steps outlined in this post to install this template in your target application.
Pre- Requisites
We need to set up a couple of items:
- A test REST server that serves device metrics for several rooms
- A Data Provider to the REST service
- A blank view containing a combobox to select which room we want information from
We will leverage the REST server and data provider in several other samples in this series, so please do take the two minutes it takes setting it up. It will be time well invested.
Setting Up the REST Server (2 Minutes)
The device metrics will be provided by a test REST server. Setting it up is straightforward thanks to json-server, a zero coding REST server:
- Install with command: npm install -g json-server (click here for more info)
- Start the server: json-server --watch dbIoT.json --port 3004 (this starts the server with the data set in file dbIoT.json, available in this github repo)
- You can verify access by trying this URL http://localhost:3004/devices
You should get a full list of about 20 records that should look like this example record:
01.{02. "id": 1,03. "room": "Schrödinger",04. "currentTemp": 21,05. "setTemp": 20,06. "hum": 65,07. "co2": 200,08. "voc": 409.}
Setting Up the Data Provider to the REST Service
- Create a Kendo UI Builder application, save it and exit Kendo UI Builder
- Copy the sample Data Provider file
from: https://github.com/thierryciot/kendoui-builder-template-samples/blob/master/DataProviders/IoT.json
to: [your application name]\meta\dataProviders\IoT.json
This will save you from having to configure the REST data provider to the Devices REST service installed in previous step.
Restart Kendo UI Builder and verify the IoT data provider is listed. When you edit the Devices data source, you should see this:
Setting Up the Blank View
The blank view is setup with a data source to our Devices REST service and with a drop-down list showing the list of rooms. Follow these steps:
- In your application, create a blank view
- In the right panel, click on the Edit button of the View’s Data Source property and create a data source like this:
- On the blank view, in one column of your choice, add a combobox component with the following properties:
Once that’s done, we are ready to create instances of our device metric component and bind these instances to a specific field from the REST record (a room with device metrics) via the model “DevicesModel.”
How do we define a component that can be bound to a field in this model? Let’s look how we do that by programming the component definition file.
Component Definition
Open the file components/custom-device-metrics-comp/custom-device-metrics-comp.json
It contains the same properties as the basic component sample, so these should be familiar to you. If not please refer to this blog post.
There are two new properties:
01."valuePrimitive": {02. "type": "boolean",03. "default": true,04. "hidden": true,05. "order": 306.},07."model": {08. "type": "string",09. "title": "Model",10. "default": "",11. "editorType": "modelName",12. "order": 413.}
In this post, we're focusing on the model. We will go into the details of valuePrimitive in the next blog when we write a multi-values component.
The model property, and more specifically the modelName editor (property editorType), provides a way to select the data source and the field to bind to the EJS model variable.
Here is how the model property renders at design-time, in the property panel:
For the first instance of my device metric custom component, I selected the model corresponding to my IoT Devices data source (DevicesModel). Then, I selected, the field currentTemp to indicate that I want the Metric component to display the current temperature from the selected room.
For the second instance, I simply selected the “hum” field (Humidity):
Now would be an appropriate time to try this for yourself: go to the blank view you created earlier and drag two instances of the custom component in two separate columns. For each one, select the model and any of the metric you like (like VOC, CO2, ect…).
Design-Time
As we did in this post, in the sample custom-hello-world-comp, we define an icon used in the component palette (Left panel).
We also define a template:
<div> <%- metric %>: 12</div>
This templates simply shows the label of the metric and a hard-coded value.
Run-Time
The run-time templates are also relatively simple.
There are two main things we need to take care of:
- We ensure we display the label for the proper instance, so we use the EJS <%-id%> string to refer to the specific instance
- We reference the proper field from the data model using the EJS <%- model %> string (the value of this will be, for the component instances, DevicesModel.currentTemp and DevicesModel.hum respectively)
The generated code for these depend on the target framework. So let’s explore each one a bit more.
Angular
The template looks like this:
1.<div class="deviceMetric">2. <span class="deviceMetricLabel">{{$config.components.<%-id%>.metric}}</span>3. <span class="deviceMetricSeparator"></span>4. <span class="deviceMetricValue">{{$dataModels.<%- model %>}}</span>5.</div>
Refer to file components/custom-device-metrics-comp/angular/template.html.ejs
The generated code base component typescript file, for example, devices.view.base.component.ts, has an object literal $dataModels with a reference to an object containing the field values we want to render in component instances
1.public $dataModels: any = {2. DevicesModel: new IoTDevice()3.};
And here is the definition for IoTDevice:
01.export class IoTDevice 02.{03. public id: number;04. public room: string;05. public setTemp: number;06. public currentTemp: number;07. public hum: number;08. public co2: number;09. public voc: number;10.}
The expression {{$dataModels.<%- model %>}} will be translated by the EJS compiler to {{$dataModels.DevicesModel.currentTemp>}} for the first instance of the custom component and to {{$dataModels.DevicesModel.hum>}} for the second instance, thus providing access to the values for the currently selected device (room).
Note: The code generator uses the data provider and data source names to generate the IoTDevice class name. If you used a different data provider than the one provided in the github repository the names will be different.
How is the model updated?
The model is updated each time the combobox is changed. This is happening because of this change handler registered within the combobox component (See file: generators/angular/generators/shared-module/templates/components/combo-box/combo-box.component.html in your generated project):
(valueChange)="changeHandler($event)"
AngularJS
Refer to file components/custom-device-metrics-comp/angularjs/directive.html.ejs:
<div class="deviceMetric"> <span class="deviceMetricLabel">{{vm.$components.<%-id%>.metric}}</span> <span class="deviceMetricSeparator"></span> <span class="deviceMetricValue">{{vm.$viewModels.<%-model%>}}</span></div>
The generated code (controller.js) defines $viewModels as an array of data source models. The expression {{vm.$viewModels.<%-model%>}} will be translated by EJS compiler to {{ vm.$viewModels.DevicesModel.currentTemp>}} for the first instance of the custom component and to {{ vm.$viewModels.DevicesModel.hum>}} for the second instance, thus providing access to the values for the currently selected device(room).
CSS Classes
Notice that for both the Angular and AngularJS frameworks we provide a set of CSS classes to further customize the appearance and content. Here are example CSS definitions to put in view styles:
01..deviceMetric{02. font-size: 120%;03. margin: 1rem;04.}05.06..deviceMetricLabel {07. font-weight: normal;08.}09.10..deviceMetricSeparator:before {11. content: ":";12. margin-right: 0.6rem;13.}14.15..deviceMetricValue {16. font-weight: bold;17.}Conclusion
A component typically needs to interact with data source items. This blog and its associated sample shows how:
- You can define a custom component that interacts with the data source model (a property with an editor of type modelEditor)
- You can leverage the model property in the component template
The component we studied is rendering a single value. In the next post, we will study a component that renders multiple values, so be sure to check it out.
Catch Up on Kendo UI Builder
If you jumped into this series in the middle and want to start from the beginning, you can find the previous blog posts here:
- Introduction to Kendo UI Builder Templates
- Behind the Scenes of Kendo UI Builder Templates
- Event Processing in Kendo UI Builder Templates
- Augmenting Models in Kendo UI Builder Templates
- Introduction to Custom Components for Kendo UI Builder
- Creating Kendo UI Builder Custom Components from Angular Components
- Creating a Custom Rating Component with Kendo UI Builder
Thierry Ciot
Thierry Ciot is a Software Architect on the Corticon Business Rule Management System. Ciot has gained broad experience in the development of products ranging from development tools to production monitoring systems. He is now focusing on bringing Business Rule Management to Javascript and in particular to the serverless world where Corticon will shine. He holds two patents in the memory management space.