Adding child views to the View

The content you're reading is getting on in years.
This post is on the older side and its content may be out of date.
Be sure to visit our blogs homepage for our latest news, updates and information.
[This post is part of the developer's manual preview published on this blog. You can find temporary TOC here.]
[This article requires Sitefinity 3.6 hotfix to be installed]
Scenario: enhance Generic Content module
Let us assume that we have been assigned with the task of adding reporting to the Generic Content module. Our client, or boss for that matter, is perfectly happy with Generic Content module, but would like in addition to have some statistics regarding the module and she would also like to be able to access it directly from Generic Content module. Long time Sitefinity users know that this task would generally include overriding the whole Generic Content module, however, that is the matter of the past. In this article we will see how Sitefinity and Controls Config file allow us to do the minimum amount of required work without any infrastructural overhead - efficiency at its best!
Before we go into the code, let us examine on the following two screenshots how should our solution look like - once it’s done.
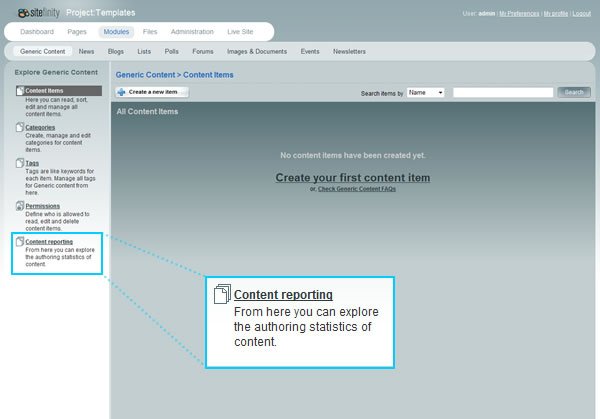
And, once the user clicks on the Content Reporting link in the command panel, we’d expect him to see the following screen.

So, our task was to extend Generic Content module with a new View for content reporting, provide the command for accessing this new view, make sure that the breadcrumb is working correctly and make sure that when user clicks on the command on the left side our View is seamlessly loaded as if it was a natural part of Generic Content module. What a mouthful!
The implementation
As it was already said, such requirement was enough to make an adult developer cry prior to Sitefinity 3.6. This kind of development would include building a new module based on Generic Content module, inheriting from dozen of classes and unavoidable nightmares on the upgrades. In Sitefinity 3.6 the solution to this problem is so simple that we will completely solve it by the end of this article.
First thing we are going to do is create a new View. As it was described in this article, we can create Views either from User Controls or Custom Controls. For the purpose of this article, we are going to create a View from a User Control. Here are step-by-step instructions on what you need to do to create the View we are going to use.
- Create a new folder in the root of your website and name it “Views”
- Add new User Control to this folder and name it “ContentReportingView.ascx” (make sure you tick the “Place code in separate file” checkbox before you add the file)
- Open the code-behind file of this User Control and derive from ViewModeUserControl base class instead from UserControl base class and set the host to GenericControlPanel, since we will be adding this View directly to the root View of the Generic Content module, namely GenericControlPanel. Once you are done, your code behind should look like this:
using System; using Telerik.Cms.Web.UI; using Telerik.Cms.Engine.WebControls.Admin; public partial class Views_ContentReportingView : ViewModeUserControl<GenericControlPanel> { protected void Page_Load(object sender, EventArgs e) { } }
- Place some user interface on the User Control to make sure that the View has been loaded when it is supposed to (visual check!). Here is the markup I’ve used for the screenshots above:
<%@ Control Language="C#" AutoEventWireup="true" CodeFile="ContentReportingView.ascx.cs" Inherits="Views_ContentReportingView" %> <div id="divWorkArea" runat="server" class="workArea insert"> <div class="mainForm"> <h3>Authoring statistics</h3> <fieldset class="set"> <ol class="setIn"> <li> <strong>Items count</strong>: 88 </li> <li> <strong>Words count</strong>: 22.547 </li> </ol> </fieldset> <div class="bottom"><div><!-- --></div></div> </div> </div>
*** NOTE ***
While the code-behind file and the markup for this sample are intentionally simple, you can make them complex and functional as much as you need. Don’t forget though, that a View should do only one single thing. If you would to develop a complex reporting functionality, you would be best off adding Subviews to the View we’ve built above, thus creating hierarchy. For more on this concept consult this article.
*** END NOTE ***
Adding a new Subview to an existing View
We are already familiar with one collection of the viewSettings element, namely the additionalTemplates collection which allows us to define multiple templates for the Control or View. Here we are about to learn of the second collection of the viewSettings element: views collection.
Views collection of the viewSettings element represents the subviews of the View defined in the hostType property of the viewSettings element. Views collection supports add, remove and clear methods as it is customary with the xml configurations and collections. To achieve our taks of injecting a new View in the Generic Content module we will put following declaration in the Controls Config file:
| <!--Root view of the Generic Content module.--> |
| <viewSettings hostType="Telerik.Cms.Engine.WebControls.Admin.GenericControlPanel"> |
| <views> |
| <add name="ContentReporting" |
| virtualPath="~/Views/ContentReportingView.ascx" |
| title="Content reporting" |
| description="From here you can explore the authoring statistics of content." /> |
| </views> |
| </viewSettings> |
At this moment our task has been completed and you can test it.
*** IMPORTANT ***
Every time you modify ControlsConfig file it is necessary to restart the application in order for the changes to be applied. While there are numerous ways to restart an application, here are few handy ones - you can restart the IIS server, resave web.config file (e.g. open web.config file, press space, press backspace, save config.file), resave global.asax file (e.g. open global.asax file, press space, press backspace, save global.asax file)…
*** END IMPORTANT ***
What is left to do is to explain what exactly we have done in the Controls Config file that had made all this work. We will analyze this process step-by-step:
- First we have declared the viewSettings element for the host or parent View to which we wish to add our child View
- By declaring the viewSettings for the host we’ve got access to the views collection which represents the collection of subviews of the host
- Then we have declared the views collection in order to be able to use add element and add our new View to the collection of Subviews of the GenericControlPanel view
- For the new Childview we have declared its unique name in the hierarchy (“ContentReporting”), it’s virtualPath since it is a User Control based (if the View we are adding would have been a Custom Control, we would declare viewType property and set its value to the fully qualified type of that control).
- Finally, in order to take advantage of automatic command generation and automatic breadcrumb, we have specified the view title and description in the mode.
The Progress Team

Latest Stories in Your Inbox
Subscribe to get all the news, info and tutorials you need to build better business apps and sites