Automatically Encrypt File and Folders Using PowerShell


In today's dangerous cyber environment, it's more important than ever to protect your data. Bad guys are always on the lookout for an easy score. As a sysadmin, it's one of your many jobs to set up security controls and make sure your network is not an easy target.
One way to do that is to ensure your network perimeter is secured to prevent any unauthorized access. However, what if your network is breached anyway? Perhaps someone physically comes into your data center and steals a server to gather valuable data you may have stored on it. If your data is not encrypted, kiss it goodbye. But, if you had the foresight to encrypt the data on that server beforehand, while your data might still be gone, at least you'll know it won't be read.
Related: How to Automate 5 Repetitive IT Tasks
Encrypting data is always a good idea but it can be hard to manage, especially across different servers and storage locations. By using Microsoft's built-in Encrypting File System (EFS) technology and PowerShell, the task of encrypting and decrypting one, two or millions of files and folders across your data center can be a lot easier.
In this article, I'll show you how you can manually encrypt and decrypt files with EFS using the GUI. Finally, I'll go over some PowerShell code that will allow you to perform this task over many different locations at once.
Encrypt Files via the GUI
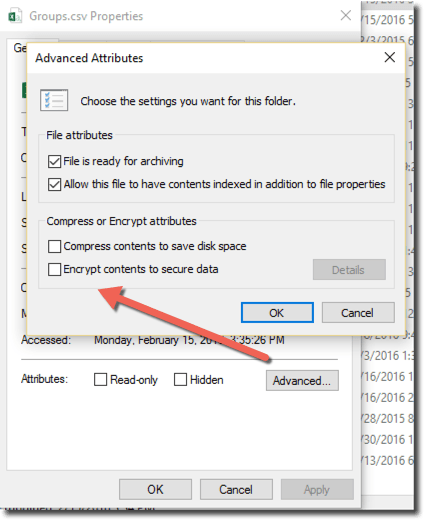
First, you'll need to find the file you want to encrypt in Windows Explorer. Right-click on the file and select Properties. Then, in the Properties pane, you'll see an Advanced button. Click that and you'll see the option to encrypt the file.

Select the "Encrypt contents to secure data" checkbox and apply the change to immediately encrypt the file. You'll notice the file icon will change.

Automating File Encryption
In a business environment, you're probably going to have to encrypt an entire folder or many different folders across different locations. If you'd rather not spend your time encrypting them manually, there's a better way: use PowerShell.
By using a PowerShell script, you can build code that will allow you to pass any number of files or folders into it to automatically encrypt them regardless of where they are.
Related: Developing a HTTP Script Monitor in PowerShell
Fortunately, Microsoft was kind to us and doesn't require a lot of scripting to make this happen. The act of encrypting and decrypting a file is as simple as calling an Encrypt() and Decrypt() method on a particular type of object, which can easily be obtained with Get-Item or, in the case of an entire folder(s), with Get-ChildItem.
For example, if I wanted to encrypt our example above with PowerShell, I'd only need a single line of code.
(Get-Item –Path C:\Groups.csv).Encrypt()
To decrypt:
(Get-Item –Path C:\Groups.csv).Decrypt()
Performing an encrypt or decrypt on an entire folder is just as easy. But, instead of using Get-Item, you'll need to use Get-ChildItem to get all of the files from within that folder.
(Get-ChildItem –Path C:\Documents).Encrypt()
Using PowerShell Functions to Encrypt Files
I personally like using PowerShell functions and cmdlets instead of .NET methods such as Encrypt() and Decrypt(). So, I'm going to build "wrapper" functions that will allow me to use Enable- FileEncryption and Disable-FileEncryption instead. To help explain how this works, let's take a look at the script.
You can download an example script to test this out. To use this script, open up a PowerShell console and "dot source" the script into your current session.
. C:\EFS.ps1
This will bring in each function declared in the script. You can now use the functions to encrypt and decrypt any files you want. For example, to encrypt a file I can use Enable-FileEncryption.
Get-Item C:\Groups.csv | Enable-FileEncryption
To decrypt, I can do the opposite.
Get-Item C:\Groups.csv | Disable-FileEncryption
To encrypt a folder, I'll use Get-ChildItem to enumerate all files in a folder.
Get-ChildItem C:\Documents | Enable-FileEncryption
To encrypt multiple folders? You can add as many as you'd like to Get-ChildItem.
Get-ChildItem C:\Documents,C:\Documents2 | Enable-FileEncryption
This approach is easier to understand and more intuitive.
The next time you need to encrypt one or more files, remember that security controls can be accomplished in PowerShell. And beyond security controls, you can also use PowerShell to automate other tasks in your job.

Adam Bertram
Adam Bertram is a 25+ year IT veteran and an experienced online business professional. He’s a successful blogger, consultant, 6x Microsoft MVP, trainer, published author and freelance writer for dozens of publications. For how-to tech tutorials, catch up with Adam at adamtheautomator.com, connect on LinkedIn or follow him on X at @adbertram.
