Creating Sitefinity 4 Content Modules Part 1: Project Preparation and Hello World

The content you're reading is getting on in years.
This post is on the older side and its content may be out of date.
Be sure to visit our blogs homepage for our latest news, updates and information.
Table of Contents
This series covering Sitefinity Content-Based Module creation is broken up into 5 parts:
- Part 1: Project Setup and Hello World
- Part 2: Data Layer
- Part 3: Backend Administration
- Part 4: Frontend Controls
- Part 5: Module Installation
Introduction
We previously looked at how you can build simple, User Control based modules called Intra-Site modules in Sitefinity. Now I’d like to kick off a new series of posts walking you through developing a complete Content-Based module.
Content-Based Modules
Every module in Sitefinity from Blogs to News to Libraries inherits its data model from Content, ensuring a unified but powerful base of features and functionality. By defining your custom modules from this same Content base, you'll get complete access to all of these features, including taxonomy, friendly Urls, search integration, as well as simpler injection of important features like security and workflow.
We want to keep things simple while showing how useful the Content model is, so we'll start by implementing a basic Locations Module from start to finish. This module will be used to maintain a list of locations, including address information.
After the basic module is complete, we'll continue with a series of posts on adding advanced features such as security, workflow, content-lifecycle, etc. To get started however, we want to just focus on developing and installing the module itself.
We'll begin by setting up your project, then build a quick "Hello, World" example before moving on to the complete implementation in the next four blog posts.
Setup Your Project
The best way to organize your custom module is to add it to your Sitefinity solution as a separate class library. In addition to improving debugging by being isolated from your web project, this also supports code reuse, and is certainly helpful if you wish to distribute your module via the Sitefinity Marketplace.
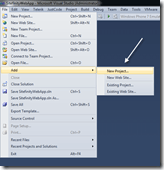
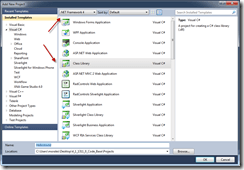
Open the solution file for your Sitefinity project then from the File menu add a New Project, making sure to use the class library project for .NET version 4.0.
Add References
The following references are required for your Module class project: The Telerik binaries should be referencing the same version as your website and in fact can reference those files directly from your website’s bin folder.
- Telerik.OpenAccess
- Telerik.OpenAccess.35.Extensions
- Telerik.Sitefinity
- Telerik.Sitefinity.Model
- Telerik.Web.UI
- System.Configuration
- System.Web
- System.Web.Extensions
- System.Runtime.Serialization
Be sure that any references you add from your website are set to “Do not copy” in the properties tab, or they will overwrite your website dll files and cause errors when you build or rebuild your solution.
Also, make sure your Sitefinity web project itself has a reference to the module project by selecting "Add Reference" from the project context menu.
Enabling OpenAccess
OpenAccess is a powerful ORM tool that is used throughout Sitefinity, and all of the Content-based modules use it in their data providers. Sitefinity now ships with the latest version of OpenAccess, so we'll develop our data provider in the same way.
In order to develop with OpenAccess, the Locations Module project must be enhanced for use with OpenAccess. This is done by unloading your project, then editing the csproj file and adding a snippet of code.
If you are using Sitefinity 4.1 (Q1) or later, the setup instructions are the same as any general .NET project, and are available here: Integration with OpenAccess Enhancer.
For earlier releases of Sitefinity (4.0 SP1 and prior), take a look at this article: Setting Up the Solution.
Folder Structure
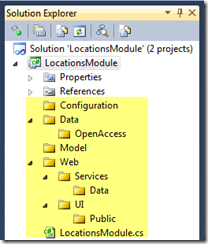
Custom modules are built from a number of class files and resources, and I find that the following structure helps keep everything organized. Setting your project up this way will also help you to follow along with the example module we'll be building over the next four posts.
- Configuration
- Data
- Data > OpenAccess
- Model
- Web
- Web > Services
- Web > Services > Data
- Web > UI
- Web > UI > Public
- Web > UI > Public > Resources
Module Class
The module class itself can go in the project root folder. For now, we'll just add the class file as a placeholder, as this class is used to install, initialize and load the Module, and these tasks require that we first develop the supporting classes.
Begin by adding a new class file called LocationsModule.cs.
All content-based modules must inherit from the ContentModuleBase abstract class, which defines all the methods required to register and use your module. Modify your class so that it inherits this class.
public class LocationsModule : ContentModuleBase
{

}
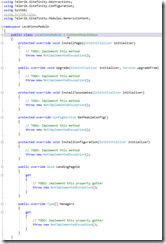
Since ContentModuleBase is abstract, we are required to override its virtual members in our derived class. Here's a tip: JustCode has a shortcut both creates these stubs and also adds any required usings to your class.
Since we're only using this as a placeholder, you can leave these methods unimplemented for now. However we'll need a few more overrides later, so let's define them now, leaving their base implementations in place.
Add the following methods to your class:
/// <summary>
/// Initializes the service with specified settings.
/// </summary>
/// <param name="settings">The settings.</param>
public override void Initialize(ModuleSettings settings)
{
    base.Initialize(settings);
}

/// <summary>
/// Installs this module in Sitefinity system for the first time.
/// </summary>
/// <param name="initializer">The Site Initializer. A helper class for installing Sitefinity modules.</param>
public override void Install(SiteInitializer initializer)
{
    base.Install(initializer);
}
Finally, add a static constant string for the Module name. Although this property is not required, the module name is used several times throughout the creation of our module, and using this property ensures that your naming is consistent and avoids any possible spelling mistakes.
#region Constants

/// <summary>
/// The name of the Locations Module
/// </summary>
public const string ModuleName = "Locations";

#endregion
You're now ready to get started developing your module!
For convenience I've included a ZIP download of the Locations Module up to this point so you can always refer to this starting point if necessary. It is available below along with the Hello World example.
Hello, World
For this example, I used a copy of the project, renaming the class to HelloWorldModule.cs. This will allow us to continue expanding the Locations Module separately in our next post.
Both the setup Locations Module and the completed Hello World project are available for download below.
Installing a basic "Hello, World" module is fairly simple; the bulk of the task is done by simply implementing the InstallPages method. This method is called during Sitefinity initialization and is used to, if not already done, install the backend pages for your module.
To do this, however, we need to first implement the LandingPageID property with a Guid. This will identify the ID of the page so we can easily check if it exists, and create it if it doesn't.
public override Guid LandingPageId
{
    get { return new Guid("ABD172FB-E2E5-4214-9AEA-B384B901C8C6"); }
}
You can use any Guid for this property, just be sure to generate a new one for each module you develop. Visual Studio has a Guid Generator in the menu under Tools > Create GUID or use an online GUID generator.
Now implement the InstallPages method with the following code snippet. Note how we make use of the LandingPageID property.
protected override void InstallPages(Sitefinity.Abstractions.SiteInitializer initializer)
{
    // code to install admin page nodes and pages
    // get pagemanager
    var pageManager = initializer.PageManager;
    var backendPagesNode = pageManager.GetPageNode(SiteInitializer.SitefinityNodeId);

    // create Landing Page if doesn't exist
    var landingPage = pageManager.GetPageNodes().SingleOrDefault(p => p.Id == this.LandingPageId);
    if (landingPage == null)
    {
        // create page
        var pageInfo = new PageDataElement()
        {
            PageId = this.LandingPageId,
            IncludeScriptManager = true,
            ShowInNavigation = true,
            EnableViewState = false,
            TemplateName = SiteInitializer.BackendTemplateName,

            // hard-code names for now, will eventually be localized
            Name = "HelloWorld",
            MenuName = "Hello World",
            UrlName = "helloworld",
            Description = "Landing page for the Hello World module",
            HtmlTitle = "Hello World Module"
        };

        pageInfo.Parameters["ModuleName"] = "HelloWorld";

        // hello world control
        var html = new Literal();
        html.Text = "<h1>Hello, World!</h1>";

        // add page
        initializer.CreatePageFromConfiguration(pageInfo, backendPagesNode, html);
    }
This method is fairly self explanatory, but the basic process is this:
First we get an instance of the PageManager from the Sitefinity initializer. Next we get the node for the backend pages of Sitefinity. This corresponds to the links in the backend navigation, such as "Dashboard", "Pages", "Content", "Administration" and so on. This is where we’ll be adding the “Hello World” module link.
Next, we query the page manager to see if the page is already installed.
If the page is not installed, we create a new PageDataElement and initialize it will the properties for our HelloWorld landing page, using the ID we grabbed earlier so the method is skipped on next run (since the page will be found).
Finally, we create a simple Literal control and create the page from the initializer class. This class takes as parameters the newly created page, the parent node under which to add this page (which we grabbed before as backendPagesNode and the controls used to manage the module.
In our case we're using this control as a simple text placeholder. In later posts we’ll create the backend and add it to the page here.
Install the Hello World Module
Module installation simply requires that we register the module in the Application Settings then restart the website so that Sitefinity is reinitialized and the module installation can run.
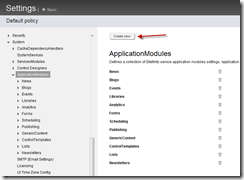
Launch your Sitefinity web site and navigate to the Administration > Settings > Advanced Settings page. From the settings tree on the left expand to the System > ApplicationModules node and click the "Create new" button.
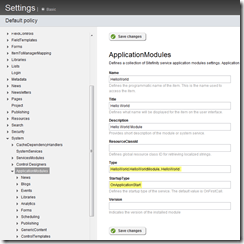
Fill in the details for your module, including the name and description. For "Type" you'll want to use the fully qualified module class as well as the assembly which contains it.
Be sure to also change the StartupType to OnApplicationStart so that it will run when you restart your website. Also, be sure to leave the Version field blank.
Save your changes, then open up the Sitefinity web.config file in Visual Studio or notepad. Add and remove a blank space, then save the file so that it is modified. This will force your application to restart on next run.
Go back and refresh your Sitefinity website. You'll notice a delay as the website is reinitialized and the module installed, after which you should see your new "Hello World" link in the navigation.
Up Next
Now that we've created the basic foundation project for our Locations Module, we can proceed to implementing the Data Layer. Download the project files below for both our Locations Module up to this point and the completed Hello, World example.
If you have any questions or comments, please also visit our Sitefinity SDK Forum and share your experience with the community.
Downloads
NOTE These solutions only contain the project for the module classes and therefore do not include the Sitefinity website or Sitefinity DLL references above. Please update these references manually to your existing Sitefinity web project, or create a new Sitefinity project and add it to the solution manually.

