Extend RadEditor dialogs to add captions for images

The content you're reading is getting on in years.
This post is on the older side and its content may be out of date.
Be sure to visit our blogs homepage for our latest news, updates and information.
Now lets take the Generic Content control template (~/Sitefinity/Admin/ControlTemplates/Generic_Content/GenericContentDesigner.ascx) and map it in the controls config xml file, then restart the website:
| <?xml version="1.0" encoding="utf-8"?> |
| <controlsConfig> |
| <viewMap> |
| <viewSettings hostType="Telerik.Cms.Engine.WebControls.Design.GenericContentDesigner" layoutTemplatePath="~/Sitefinity/Admin/ControlTemplates/Generic_Content/GenericContentDesigner.ascx" /> |
| </viewMap> |
| </controlsConfig> |
We would also need to provide a path for external dialogs for the RadEditor. Create a folder ~/Sitefinity/Admin/ControlTemplates/CustomEditorDialogs and set the RadEditor ExternalDialogsPath property:
| <telerik:RadEditor |
| runat="server" |
| ID="textEditor" |
| ... |
| ExternalDialogsPath="~/Sitefinity/Admin/ControlTemplates/CustomEditorDialogs"> |
The next step is to provide an external layout template for the ImageEditorDialog control. To do this open ~/Sitefinity/UserControls/Dialogs/ImageEditorDialog.aspx and modify the markup of the ImageEditorDialog:
| <lib:ImageEditorDialog runat="server" DisplayMode="Images" |
| ControlTemplatePath="~/Sitefinity/Admin/ControlTemplates/Libraries/Dialogs/ImageEditorDialog.ascx"/> |
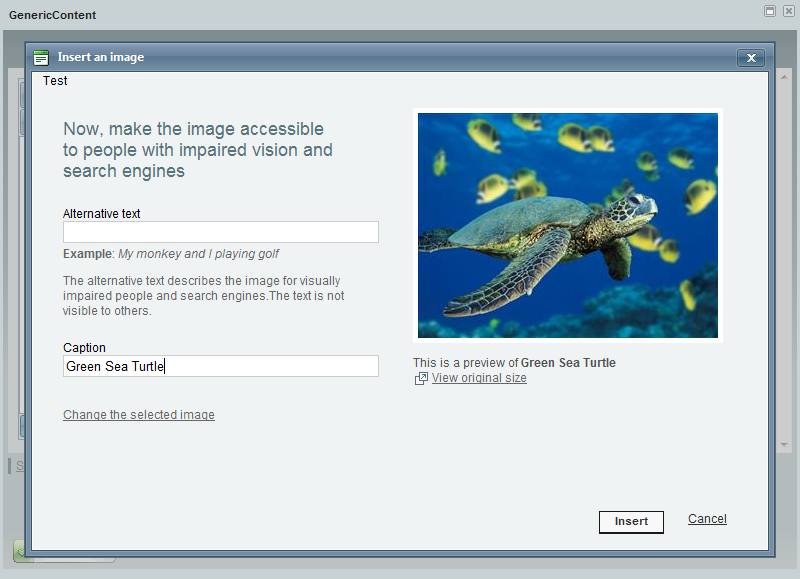
Now we need to add a text box to input image caption text and modify the JavaScript in the layout template to return both the image and caption text. Open ~/Sitefinity/Admin/ControlTemplates/Libraries/Dialogs/ImageEditorDialog.ascx and edit the markup like this:
| <div class="uploadedImageData"> |
| <li> |
| <asp:Label ID="Label2" runat="server" Text="<%$Resources:AlternativeText %>" AssociatedControlID="altTxt"></asp:Label> |
| <asp:TextBox runat="server" ID="altTxt"></asp:TextBox> |
| <p class="example"><asp:Literal ID="Literal7" runat="server" Text='<%$Resources:AlternativeExample %>'></asp:Literal></p> |
| <p class="example"><asp:Literal ID="Literal8" runat="server" Text='<%$Resources:AlternativeDesc %>'></asp:Literal></p> |
| </li> |
| <li> |
| <asp:Label ID="captionLabel" runat="server" text="Caption" AssociatedControlID="captionTxt"></asp:Label> |
| <asp:TextBox runat="server" ID="captionTxt"></asp:TextBox> |
| </li> |
| </div> |
Then modify the JavaScript function which returns the selected image, this function is called insertLink():
| <script type="text/javascript"> |
| var currentElement = document.createElement("img"); |
| //create div element |
| var divElement = document.createElement("div"); |
| ... |
| function insertLink() //fires when the Insert Link button is clicked |
| { |
| var closeArgument = currentElement; |
| //create new div element |
| var div = divElement; |
| var captionTxt = document.getElementById('<%=captionTxt.ClientID %>'); |
| selValue = document.getElementById('<%= selectedValueField.ClientID %>'); |
| editHolder = document.getElementById('<%= editHolder.ClientID %>'); |
| var uplImg = document.getElementById('<%= uploadedImage.ClientID %>'); |
| if (editHolder.style.display == 'none') { |
| if (selectedItem) |
| closeArgument.alt = selectedItem.altText; |
| else |
| closeArgument.alt = ''; |
| closeArgument.src = selValue.value; |
| } |
| else { |
| var altTextTxt = document.getElementById('<%= altTxt.ClientID %>'); |
| closeArgument.src = selValue.value; |
| if (altTextTxt) |
| closeArgument.alt = altTextTxt.value; |
| } |
| if (selValue.value.indexOf("~/") == 0) { |
| closeArgument.setAttribute("sfref", selValue.value); |
| } else if (selectedItem != undefined && selectedItem.unresolved) { |
| closeArgument.setAttribute("sfref", selectedItem.unresolved); |
| } else if (uplImg != undefined && uplImg.attributes["sfref"] != undefined) { |
| closeArgument.setAttribute("sfref", uplImg.attributes["sfref"].value); |
| var imgSrc = uplImg.src; |
| if(imgSrc.indexOf("?") < 0){ |
| closeArgument.src = imgSrc; |
| } |
| else |
| closeArgument.src = imgSrc.slice(0, imgSrc.indexOf("?")); |
| } else { |
| closeArgument.removeAttribute("sfref"); |
| } |
| //add image to div |
| div.appendChild(closeArgument); |
| //optional assign class name to containing div |
| div.className = "ImageBox"; |
| var caption = document.createTextNode(captionTxt.value); |
| var span = document.createElement("span"); |
| //optional assing class name to span containing caption text |
| span.className = "CaptionText"; |
| //adds the text from textbox to the containing span |
| span.appendChild(caption); |
| var br = document.createElement("br"); |
| div.appendChild(br); |
| //add span to the containing div |
| div.appendChild(span); |
| if(getRadWindow()){ |
| var radWindow = getRadWindow(); |
| //return the div as return argument of the radWindow |
| radWindow.argument = div; |
| radWindow.close(div); //use the close function of the getRadWindow to close the dialog and pass the arguments from the dialog to the callback function on the main page. |
| } |
| } |
As the inline comments say you can assign CSS class names to the image containing div and the span containing the caption text. Then add rules in your themes to style the caption. See attached image for the result of our customizations.

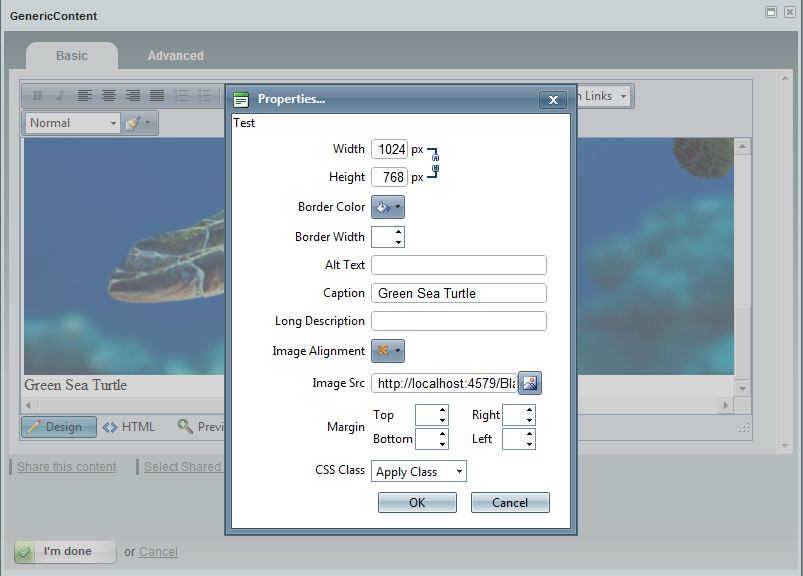
Once we are done with customizations for inserting captions we also have to modify the dialog which is used for setting image properties. This is the reason why we mapped a path for external dialogs for the RadEditor. In the file attachment you will find the external dialog we are editing (~/Sitefinity/Admin/ControlTemplates/CustomEditorDialogs/SetImageProperties.ascx). Open this file and first edit the markup to add a text box for the image caption:
| <tr> |
| <td class="reLabelCell" style="width: 120px;"> |
| <label class="reDialogLabel" for="CaptionTxt"> |
| <span style="text-align: right;"> |
| Caption |
| </span> |
| </label> |
| </td> |
| <td class="reControlCell"> |
| <input type="text" id="CaptionTxt" style="width: 165px;" /> |
| </td> |
| </tr> |
Then we need to add some JavaScript to first load the already inserted caption text. Add this to the loadImageProperties function:
| loadImageProperties: function(originalImage) { |
| ... |
| this._imageAlt.value = this._getAttribute(currentImage, "alt"); |
| this._imageLongDecs.value = this._getAttribute(currentImage, "longDesc"); |
| this._imageAlignment.setTagName("IMG"); |
| //populate the Caption textbox |
| $get('CaptionTxt').value = originalImage.parentElement.lastChild.innerText; |
| ... |
Then we need to save the caption text once the OK button has been clicked. Modify the getModifiedImage function:
| getModifiedImage: function() { |
| ... |
| this._setAttribute(resultImage, "alt", this._imageAlt.value); |
| this._setAttribute(resultImage, "longDesc", this._imageLongDecs.value); |
| //set the new value of the caption text |
| this._originalImage.parentElement.lastChild.innerText = $get('CaptionTxt').value; |
| ... |
Now the dialog for setting image properties will look like this:

You can download the sample markup and JavaScript code from this link: CustomEditorDialogs
More information on working with external dialogs for the RadEditor can be found here: RadEditor ExternalDialogsPath property.

