Flowmon and OpenVAS Integration

Rest API, provided by Flowmon, is a great tool to strengthen the security of organisations and enabling you to integrate FLOWMON with many existing security solutions.
A few weeks ago, I read an article describing how to use the Flowmon API. After that I knew I needed to check out how the API works; so I started to integrate it with the OpenVAS vulnerability scanner.Let us say a few words first about OpenVAS. It is an open-source vulnerability scanner, a perfect choice for organisations wanting to make their security monitoring more thorough using free, open-source systems. OpenVAS can be controlled in several ways using a GUI, API, and via CLI on a Linux machine. For integration I use CLI commands.A graph showing the integration of Flowmon and OpenVAS is presented below:
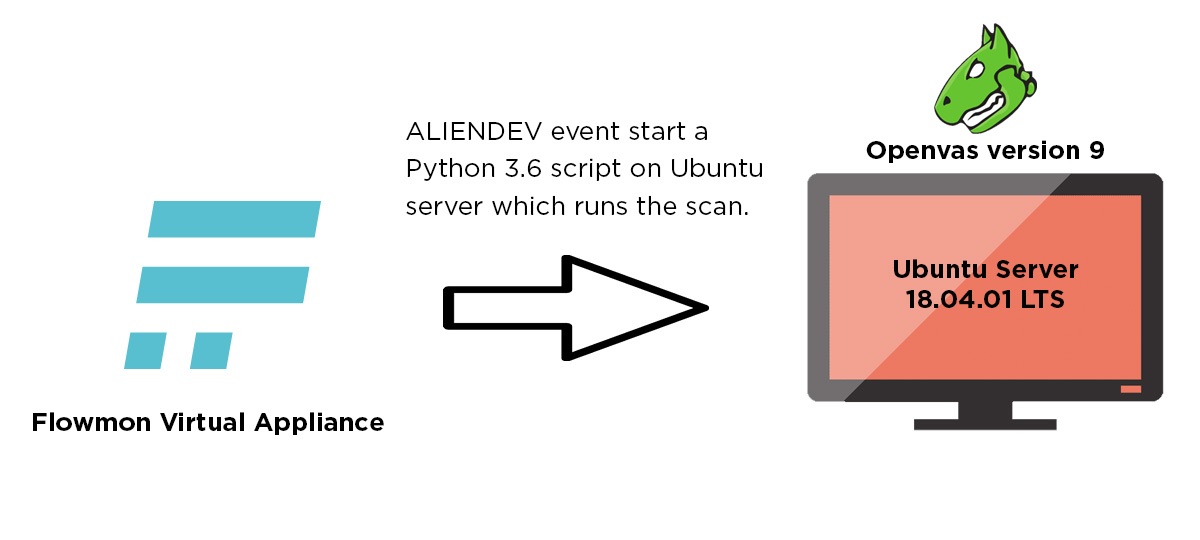
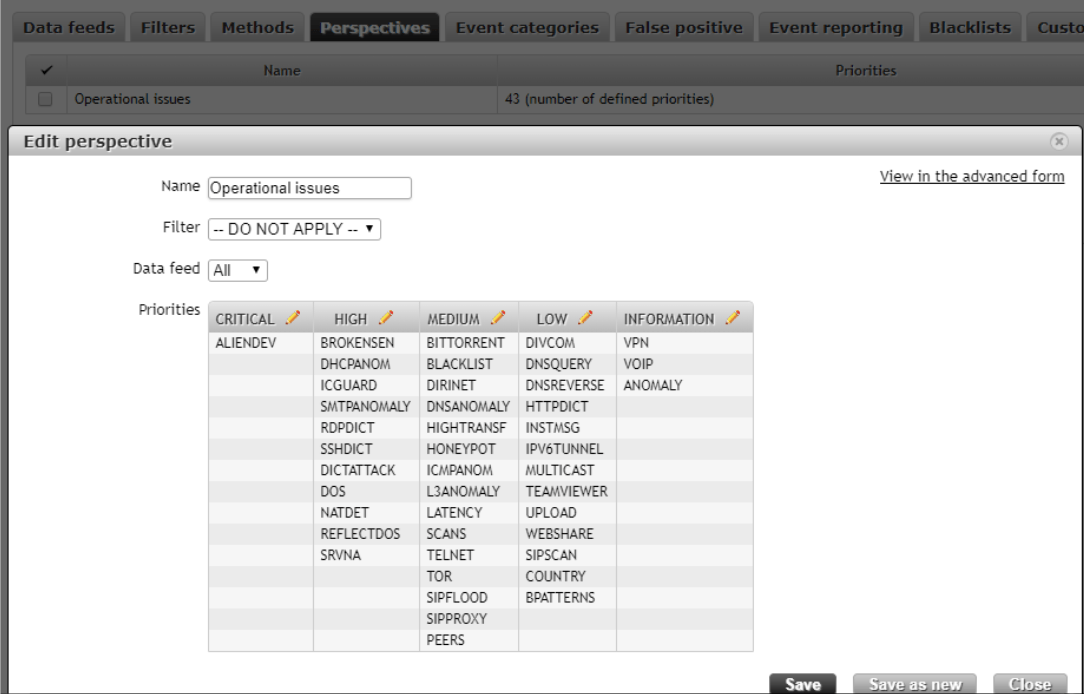
The source of flows here is the Fortigate Firewall. When a Flowmon ALIENDEV event appears flowmon runs a script that connects to the Ubuntu Server where OpenVAS is installed, and starts a script written in Python3. The Python Script downloads the remaining Aliendev events from Flowmon using the REST API and then parses the ip address of the new device. It then creates a new target and scan in OpenVAS.Now that we have the draft of the integration, let us focus on the Flowmon configuration and Python script.First, we need to add ALIENDEV events from a proper perspective to the severity group. It is important that in this severity group there should be no other methods, because the script would also start events of these methods. I have added only an ALIENDEV method to the CRITICAL events, because for me it is crucial to see new devices in a monitored network.
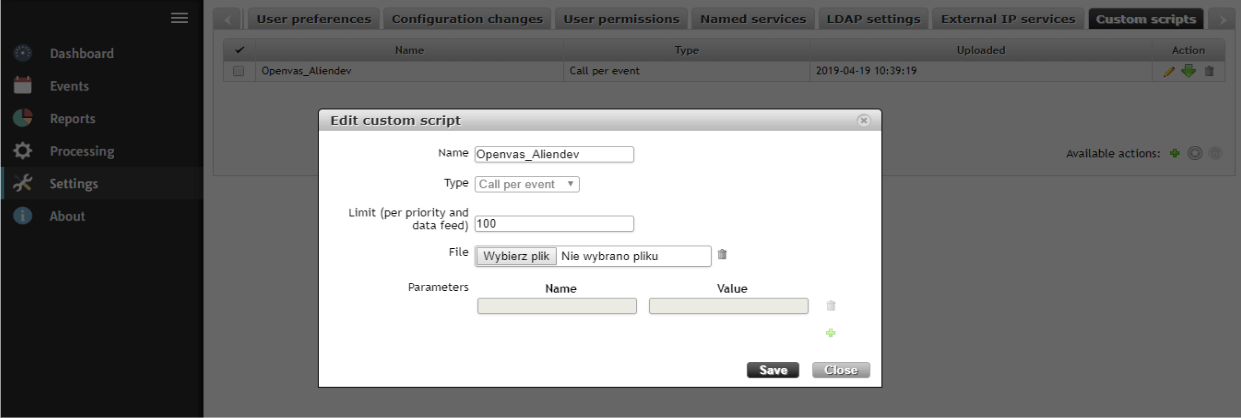
Next, we need to upload a bash script to Flowmon, which will connect to an OpenVAS machine and start a Python script prepared for scanning. The script is given in a further part of this article.
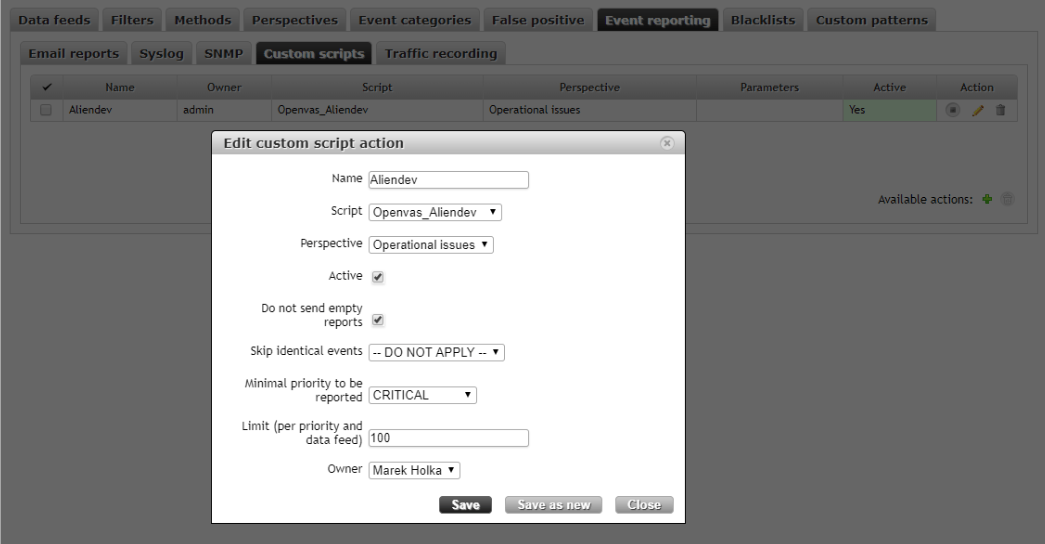
Afterwards, we need to bind a bash script with ALIENDEV Events. So, I have choosen a proper script, our perspective, and selected the severity as Critical as a minimal severity to run a bash script. It is important to mark a field as active, because by default it is not marked and the script would not run.
Because the configuration on the Flowmon side is completed, let us take a look at what the ALIENDEV events presents.
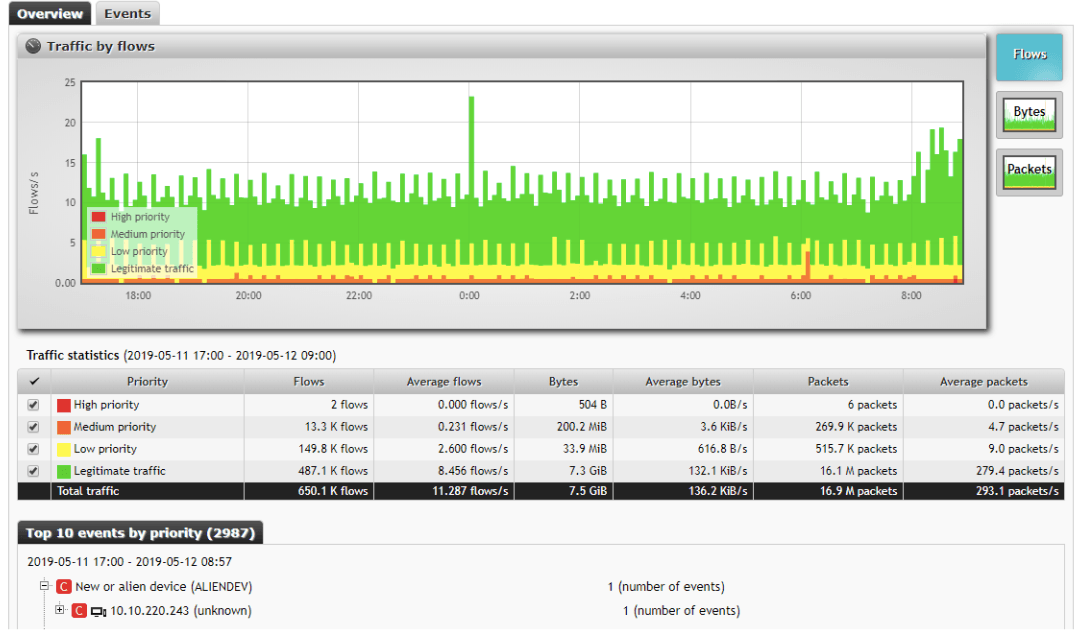
As we can see there is a new ALIENDEV event and it is classified as a critical event; so the configuration is correct. When the event appears it starts the bash script:
Flowmon_ALIENDEV.sh
#!/bin/bash
sshpass -p <password to ubuntu machine> ssh -o StrictHostKeyChecking=no <login to ubuntu machine>@<adress of ubuntu machine> 'echo <password to ubuntu machine> | sudo -S python3.6 <path to Python script on ubuntu machine>'
When the script runs, Flowmon connects and logs on to the Ubuntu machine using the sshpass command; then it opens a Python script that starts a scan on OpenVAS. So, if we know that an ALIENDEV event is generated and the bash script starts, we can go to OpenVAS where we can check whether a scan was created.
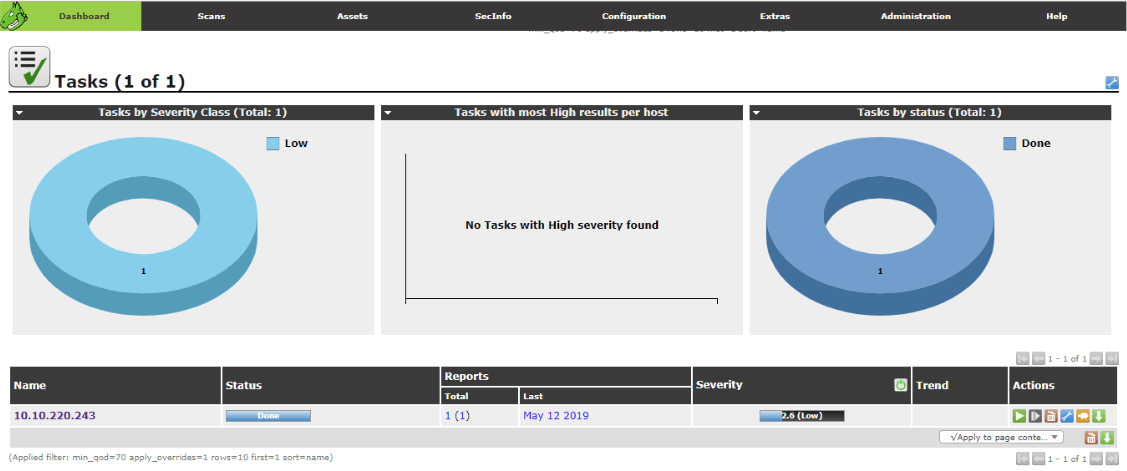
As we can see there is a completed scan for an ip address from an ALIENDEV event; so Flowmon has generated a scan on OpenVAS successfully. Now we know that the Python script that runs a scan on OpenVAS is working correctly let us say a few words as to how the Python script works.
At the very beginning of the script we need to specify the modules, which we also need to install as a Python library on the Ubuntu machine. The modules are:
import requests
import json
import re
import datetime
import random
import subprocess
After this piece of code I have to define variables, which define a timeframe for the requested events.
event_time = datetime.datetime.now() - datetime.timedelta(seconds=240)
event_time = str(event_time)[:-7]
current_time = datetime.datetime.now()
current_time = str(current_time)[:-7]
The script uses these variables to get ALIENDEV events, which appear 4
minutes before the script starts.
In the next step I will add the authorisation to the API of FLOWMON to get a token.
data = [
('grant_type', 'password'),
('client_id', 'invea-tech'),
('username', '<login to Flowmon>'),
('password', '<Password to FLOWMON>'),
]
response = requests.post('https://<FLOWMON Addres>/resources/oauth/token',
data = data, verify=False)
responsejson = json.loads(response.text)
token = responsejson["access_token"]
After this, the script downloads all the unparsed ALIENDEV events in the time frame mentioned above.
headers = {
'Authorization': 'bearer ' + token,
}
params = (
('search',
"""{"from":""" + '"' + event_time + '"' + """,
"to":""" + '"' + current_time + '"' + """,
"perspective": "6",
"type":"ALIENDEV"}
"""),
)
response = requests.get('https://<FLOWMON address>/rest/ads/events',
headers=headers, params=params,verify=False)
kontent = str(response.content)
It is important to pass a proper perspective number here, because if we use a different perspective we get a blank response. To check the proper
perspective number we can list all the perspectives with their numbers and configurations using
the code below:
headers = {
'Authorization': 'bearer ' + token,
}
response = requests.get('https://<Flowmon Address>/rest/ads/perspectives'
, headers=headers, verify=False)
print(response.content)
responsejson = json.loads(response.text)
print(json.dumps(responsejson, sort_keys=True, indent=4))
If we know our perspective number and get a proper response for the ALIENDEV event it is time to parse the ip addresses from our response. To do this we need to add the code below.
ip_candidates = re.findall(r"\d{1,3}\.\d{1,3}\.\d{1,3}\.\d{1,3}\b", kontent)
After all the addresses that the script finds, we then need to add them to a more elegant list.
IP_LIST = []
for i in ip_candidates:
IP_LIST.append(i)
In the next step there is another ‘for’ loop, which creates all the events in the later part of the scripts for all ip addresses found in the ALIENDEV events:
for ip_address in IP_LIST:
The code will now use a Linux CLI command to create a target, and it will parse a target id, which will be used to create a scan.
Target_Creation = subprocess.check_output('omp --username <login to OpenVas> --password <Password to Openvas> --xml="<create_target> < name>'
+ 'FlowmonScan ' + str(random.randint(1,1000000)) + '</name> <hosts>'
+
str(ip_address) + '</hosts> </create_target>"', shell=True) #it createes a target for
scan in Openvas
target = re.findall(r"........\W....\W....\W....\W............", str(Target_Creation)) #it is parsing a target_id
target= str(target).strip("['']")
OpenVAS GUI view:

The next line will create a task to scan in OpenVAS. The parameter value ‘-c’ is stated for the type of scan in OpenVAS, which is ‘Full and very deep’. The scan types have their own id, which you can list using a cli command for OpenVAS.
task = subprocess.check_output('omp --username <login to Openvas> --password <Password to Openvas> -C -c 708f25c4-7489-11df-8094-002264764cea --target=' + target + ' ' + str(ip_address) + '', shell=True)
OpenVAS GUI view:
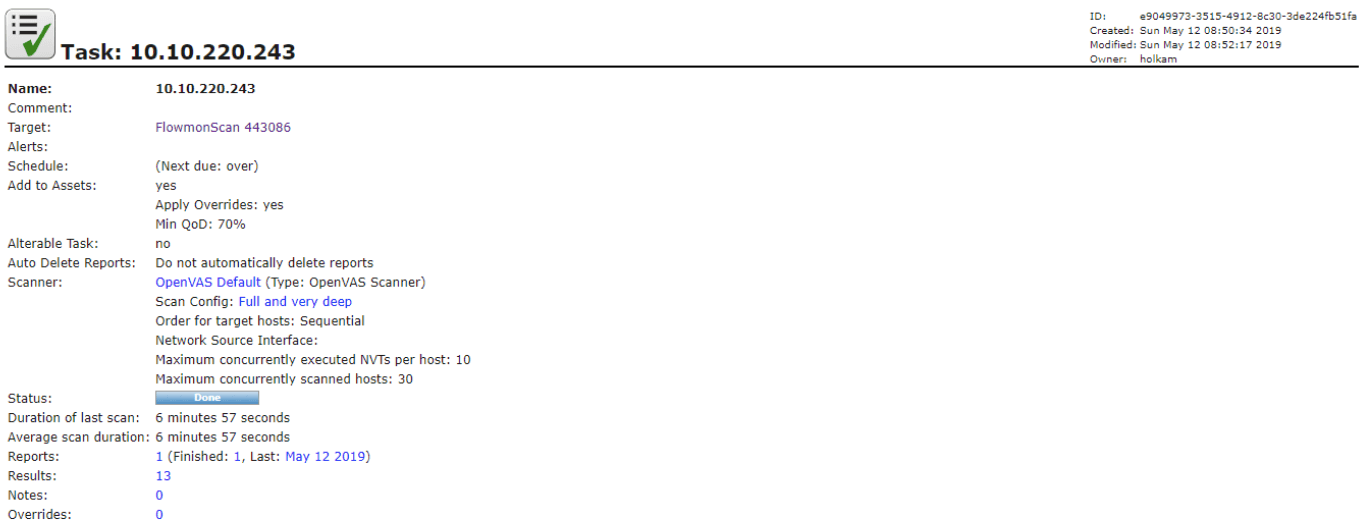
The next lines of code list all the tasks, and get the id of the last created task:
show_task = subprocess.check_output('omp --username <Login to Openvas> --password <Password to Openvas> --get-tasks', shell=True)
show_task = str(show_task)
show_task = show_task[-66:-30]
At the end of script there is a line that starts a task using the abovementioned task id:
start_task = subprocess.check_output('omp --username <Login to Openvas> --password <Password to Openvas> --start-task ' + show_task + '', shell=True) #it starts a task
OpenVAS GUI view end of scan and report:
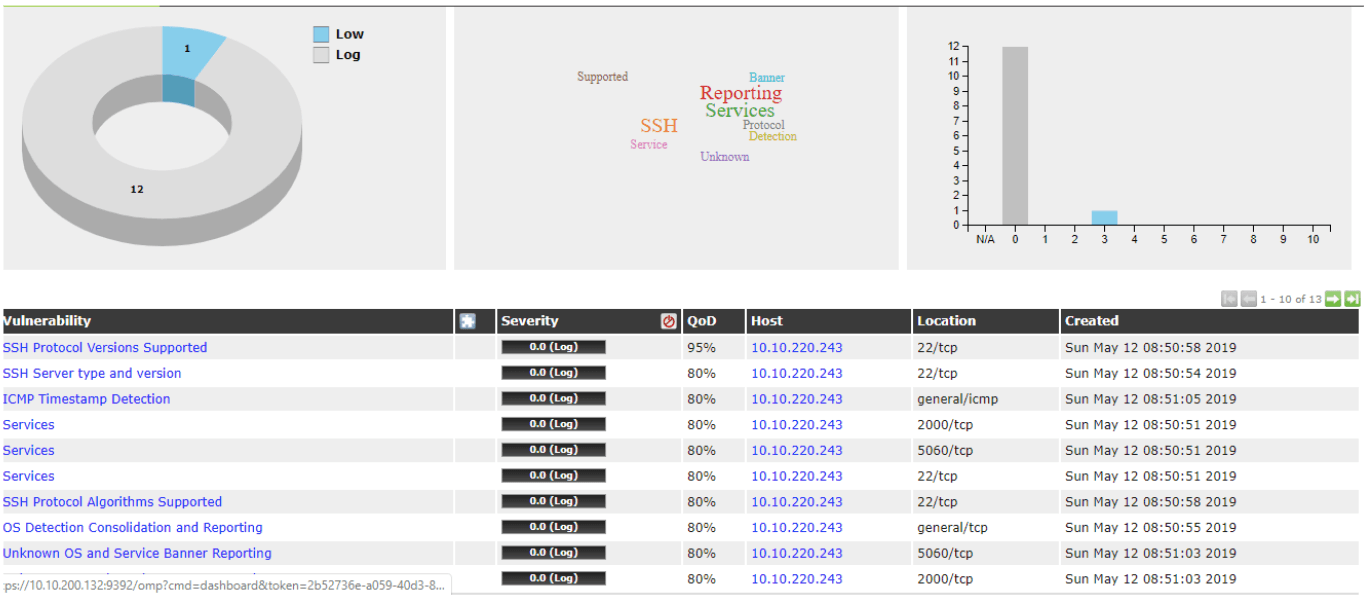
Full Python code:
import requests
import json
import re
import datetime
import random
import subprocess
event_time = datetime.datetime.now() - datetime.timedelta(seconds=360)
event_time = str(event_time)[:-7]
print('\"' + event_time + '\"')
current_time = datetime.datetime.now()
current_time = str(current_time)[:-7]
print('\"' + current_time + '\"')
data = [
('grant_type', 'password'),
('client_id', 'invea-tech'),
('username', '<Login to Flowmon>'),
('password', '<Password to Flowmon>'),
]
response = requests.post('https://<Flowmon Address>/resources/oauth/token',
data = data, verify=False)
responsejson = json.loads(response.text)
print(response.text)
token = responsejson["access_token"]
headers = {
'Authorization': 'bearer ' + token,
}
params = (
('search',
"""{"from":""" + '"' + event_time + '"' + """,
"to":""" + '"' + current_time + '"' + """,
"perspective": "6",
"type":"ALIENDEV"}
"""),
)
response= requests.get('https://<Flowmon Address>/rest/ads/events', headers=headers, params=params,verify=False)
kontent = str(response.content)
ip_candidates = re.findall(r"\d{1,3}\.\d{1,3}\.\d{1,3}\.\d{1,3}\b", kontent)
IP_LIST=[]
for i in ip_candidates:
IP_LIST.append(i) #it is adding a addresses from current ALIENDEV events to the list
for ip_address in IP_LIST:
Target_Creation = subprocess.check_output('omp --username <login to
OpenVas> --password <Password to Openvas> --xml="<create_target> <name
>' + 'FlowmonScan ' + str(random.randint(1,1000000)) + '</name>
<
hosts>' + str(ip_address) + '</hosts> </create_target>"', shell=True) #it createes a target for
scan in Openvas
target = re.findall(r"........\W....\W....\W....\W............", str(Target_Creation)) #it is
parsing a target_id
target = str(target).strip("['']")
task = subprocess.check_output('omp--username <login to OpenVas> --
password <Password to Openvas> -C -c 708f25c4-7489-11df-8094-002264764cea
--target=' + target + ' ' + str(ip_address) + '', shell=True) #it creates a task in Openvas
show_task = subprocess.check_output('omp --username <login to OpenVas> --
password <Password to Openvas> --get-tasks', shell=True)
show_task = str(show_task)
show_task= show_task[-66:-30]
start_task = subprocess.check_output('omp --username <login to OpenVas> --
password <Password to Openvas> --start-task ' + show_task + '', shell=True) #it starts a task
You can use this code to monitor a specific network in your organisation, such as WIFI or LAN. It only depends on your imagination and of course the Flowmon configuration. Thanks to Arkadiusz Kulesza from ITSS who also has a part in this project.
Author: Marek Hołka, Junior Security Engineer, IT Systems and Solutions Sp. z o.o.
