Getting Started using Robocopy to Transfer Files

In this article, we will explore common scenarios and how Robocopy can be used to make system administrators' lives easier. Using version 10.0.18362 for this article and is the version that comes with Windows 10 1903.
One of the most common tasks that a system administrator has is copying files between servers and network locations. There are many ways to do this, but for Windows administrators, one of the most powerful is by using the Robocopy utility. Around since the Windows NT days, Robocopy has a plethora of options that make most file transfer scenarios that much easier to handle.
What is Robocopy, and Why is it Useful?
Why not just use simple system commands like mv or cp? Those commands are very basic in the features that they offer, and when more complex scenarios come along are inadequate. Some of Robocopy's features that make file transfer tasks more reliable are listed below:
- Resume Capabilities
- Copy NTFS permissions, owners, and file metadata
- Copy files using "Backup" mode for normally inaccessible files
- Automatic Retires
- Sync Two Files
- Copy File Paths Larger than the 256 Character File Limit
As you can see, there are a lot more options than your typical mv or cp command and are particularly suited for administrative tasks such as backups or network replication.
Exploring Robocopy and Its Options
Now that we have an idea of what Robocopy can do let's see what are some of the most common options. There are many, and the intention is not to cover all of the possible ones here but instead highlight some of the most useful.
Source Options
- /S - Copy subfolders
- /E - Copy subfolders including empty folders (useful for recreating a folder structure)
- /COPYALL - Copy all file info, such as attributes and timestamps
- /MAXAGE & /MINAGE - Use these to filter the file ages, either maximums or minimums
Destination Options
- /A+ & /A- - Add or remove file attributes to the given files
- /CREATE - Create a directory tree and zero-length files only
Copy Options
- /Z - Use restartable mode in case the file transfers are interrupted
- /B - Use backup mode, which uses SeBackupPrivilege and SeRestorePrivilege privileges to backup files that normally require Administrative rights
Default Options
It's important to note that when running simple Robocopy commands, there are a set of default options used.
*.* /DCOPY:DA /COPY:DAT /R:10000000 /W:30
These translate into the following set of commands:
- *.* - Copy all files without a filter.
- /DCOPY:DA - Default directory copy options. Data and attributes (but not timestamps).
- /COPY:DAT - Default file copy options. Data, attributes, and timestamps.
- /R:10000000 - Number of times to retry on failure, default is 1 million.
- /W:30 - The wait time between retry attempts, default is 30 seconds.
Common Examples
So now that you know a few of the options available to Robocopy, what are some of the most common operations that we can do?
Verification of the File Transfer Operation
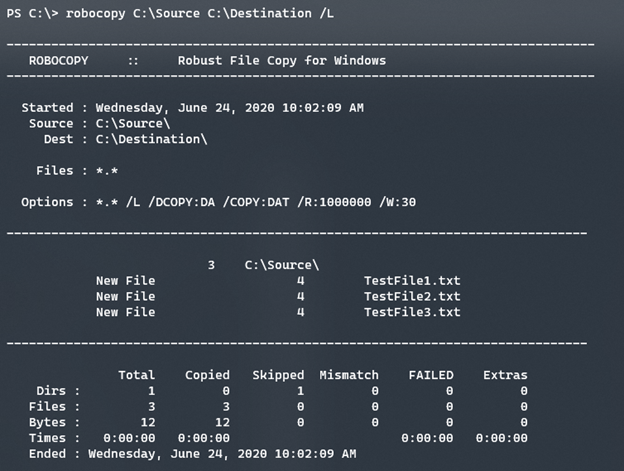
Before running a complicated file transfer operation, it's important that know that Robocopy will do what you expect it to do. By using some simple switches, in conjunction with your intended switches, you can see what would happen before actually performing the command. This is done using the /L command, as seen below.
robocopy C:\Source C:\Destination /L

As you can see from the above screenshot, there are three files that we intend to copy to the destination location. Although you may see the Copied header show 3, if you actually browse to the location, you will find that nothing has actually been copied.
Remember that the command above actually runs with the following options by default. *.* /L /DCOPY:DA /COPY:DAT /R:1000000 /W:30
Copy All Files From a Source Directory to a Destination
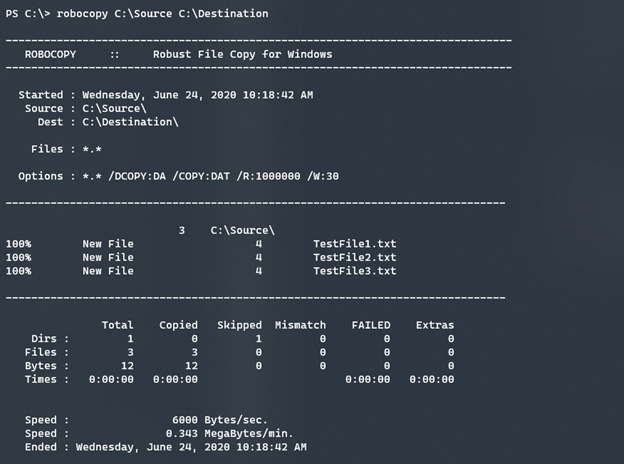
Ok, now that we know our copy command will do what we want, let's copy all of those files over to the destination directory.
robocopy C:\Source C:\Destination

This time, we can see that our three files copied over successfully. You may also note that there is a percentage complete next to each file and, at the end, a speed calculation. This further shows that an operation actually occurred rather than just the listing, as shown first.
Only Transfer Newest Files
Now that we have copied those three initial files, suppose a new file was just dropped in that folder, and we only want to transfer the new one and not the other three that have already been copied over. Thankfully there is a simple switch for that which is /XO and translates to, exclude older.
robocopy C:\Source C:\Destination /XO

As you can tell from the screenshot, only the new file was transferred. Exactly what we wanted, and you can further tell that it ignored the other files by noting the skipped column.
Exclude Non-Text Files
Somebody went ahead and dropped a number of image files into the directory, but you only want to transfer the newest text files. How do we filter out anything but those text files? Thankfully you can easily filter out files. At the beginning of this article, we noted that the default file filter is *.*, which means all files and extensions. To include only the newest text files, we can run the Robocopy command like below.
robocopy C:\Source C:\Destination *.txt /XO

What you may notice is that if you run this command, it will only state that there are 4 skipped files. If you were to look at the directory, in this case, we have three picture files. Why are those not shown as skipped? This is because the filter excludes those files entirely. If we run the command to list files and do not filter by only text files, the picture files are picked up.
robocopy C:\Source C:\Destination /XO /L

Note that both * and ? can be used as wildcard characters for the file filter.
Summary
As countless technology professionals have found over time, Robocopy is an invaluable tool for many common and critical file transfer options. With a plethora of options and possibilities, Robocopy does short work of even the most demanding of file transfer tasks. Further, incorporating Robocopy into scripts allows even further utility. With the added benefit of Robocopy being built-in to Windows, it's easy to get started!

Adam Bertram
Adam Bertram is a 25+ year IT veteran and an experienced online business professional. He’s a successful blogger, consultant, 6x Microsoft MVP, trainer, published author and freelance writer for dozens of publications. For how-to tech tutorials, catch up with Adam at adamtheautomator.com, connect on LinkedIn or follow him on X at @adbertram.
