Setting up Rollbase on a JBoss Cluster

Rollbase has always supported Tomcat for an AppServer, but we've now extended support to JBoss. Learn how to configure a JBoss AppServer.
Rollbase includes a set of auxiliary runtime components which can be run on a single host for small loads or be deployed across multiple hosts for scaling purposes. As Rollbase usage grows, you can add instances of these runtime components to provide adequate performance for all users. When you run Rollbase production servers on multiple hosts, the router component calculates the least loaded server and directs newly logged in users to that server.
Rollbase has always supported Tomcat as the AppServer, but (as of Rollbase 4.3.1), we've extended support to run Rollbase on a JBoss (EAP v6.3) AppServer. With this new support, we give more choices for customers to choose an appropriate AppServer to deploy Rollbase based on their requirements.
In this tutorial, we'll walk you through setting things up on a JBoss EAP 6.3 Cluster.
Configuring Rollbase on a JBoss Cluster
Prerequisites
Setting up Rollbase in a JBoss EAP 6.3 Cluster
JBoss EAP supports two types of deployment models to run in cluster mode: domain and standalone. The following sections explain how to configure and deploy Rollbase in both domain and standalone modes.
Domain Mode
- Before the start of deployment, make sure you have at least two machines to configure a cluster (we'll call the two machines MachineA and MachineB)
- Unzip JBoss EAP 6.3 to MachineA
- Create a directory structure rb/lib/main under JBOSS_HOME/modules
- Copy all the libraries from <Rollbase private cloud distribution package>/lib to the rb/lib/main folder along with module.xml
- If we want to use database as MySQL, copy the MySQL connector jar into rb/lib/main folder and then update module.xml with the newly added jar:
<resource-root path="mysql-connector-java-5.1.25-bin.jar"/>
In case of domain type deployment, go to JBOSS_HOME/domain/ - As this is a domain type deployment, go to JBOSS_HOME/domain/configuration, open domain.xml and look for <subsystem xmlns="urn:JBoss:domain:ee:1.2"> and add the text below under it:
<global-modules><module name="rb.lib" slot="main"/></global-modules>
So, it should finally look like this:
<subsystem xmlns="urn:JBoss:domain:ee:1.2">
<global-modules>
<module name="rb.lib" slot="main"/>
</global-modules>
<spec-descriptor-property-replacement>false</spec-descriptor-property-replacement>
<JBoss-descriptor-property-replacement>true</JBoss-descriptor-property-replacement>
<annotation-property-replacement>false</annotation-property-replacement>
</subsystem>
- By default the JBoss installation does not have any servers in domain. To get servers, you need to start the JBoss EAP server once. After that we get server-one and server-two folders in domain folder.
- Now copy the Rollbase directory from your Rollbase private cloud distribution to the server-one folder
- Modify the “shared.properties” file with the hostname provided in license.xml, along with other Gmail account settings. Ensure the hostname is where the httpd server is running. Please look at the example below for the changes in shared.properties file:
#Email address of first admin user
AdminEmail=rollbaseJBoss@yopmail.com
#SMTP specific properties
MailPort=465
MailUseSSL=1
MailTimeoutSec=10
MaxEmailQueueSize=100
#Email Service Type
MailHost=smtp.gmail.com
#User name and password for SMTP/Exchange emails sender
MailUser=<Gmail Id>
MailPassword=<Gmail Password>
#Default host name
HostName=Host name in license file
#URL of corporate web site (no slash at the end)
WebSiteHTTP=http:// <HostName>
WebSiteHTTPS=https://< HostName>:443
- Modify the database.xml file with proper database connection details
- Modify internalroot of component.xml with machine IP Address for respective components
- Modify the profile of main-server-group to full-ha in domain.xml. By default, the main-server-group has the “full” profile, but since this profile does not have ajp connector, you need to change it to “full-ha” mode.
- Refer to JBoss documentation for creating users
- Now start JBoss Server with the following command: <JBOSSHOME>\bin\domain.bat -b 0.0.0.0
- Access the JBoss Management console on http://localhost:9990/ and login
- Repeat steps 1-14 for MachineB.
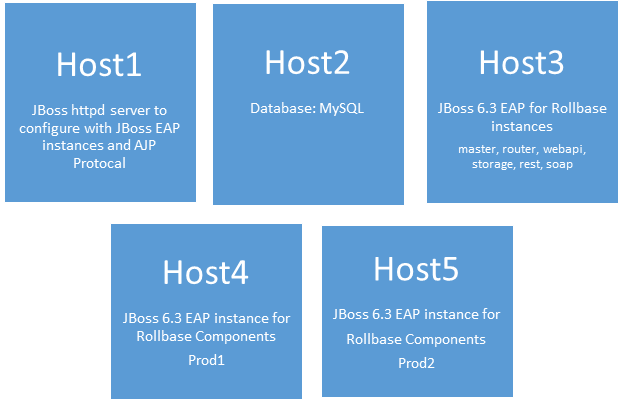
- Now deploy master, router, search, rest, soap, webapi and workflow in one instance (MachineA) and assign it to the main-server-group

- Deploy prod1.war in another instance (MachineB) and assign it to main-server-group
- If we want to deploy another prod server rename the prod1.war to prod2.war in MachineC and update Components.xml with this Component
Now you will be able to see that both JBoss instances are up and running.
Standalone Mode
- Unzip JBoss EAP 6.3 to two different machines.
- Create a directory structure rb/lib/main under JBOSS_HOME/modules. Let's call this ROLLBASE_LIBS.
- Copy all the libraries from <Rollbase private cloud distribution package>/lib to the rb/lib/main folder along with module.xml.
- If we want to use database as MySQL, copy the MySQL connector jar into the rb/lib/main folder and update module.xml with newly added jar:
- As this is standalone, go to JBOSS_HOME/standalone/configuration, open standalone.xml and look for <subsystem xmlns="urn:JBoss:domain:ee:1.2">. Then add the text below under it:
- Now copy the Rollbase directory from your Rollbase private distribution to the <JBOSSHOME>/standalone folder
- Modify the "shared.properties" file in both instances with the hostname provided in license.xml along with other Gmail account settings. Ensure that the hostname is where the httpd server is running. Below are the changes you should make in the shared.properties file:
- Modify the database.xml file with the proper database connection details.
- Modify internalroot of component.xml with machine IP Address for the respective components
- Now start the JBoss Server with command, <JBOSSHOME>\bin\standalone.bat -c standalone-ha.xml -b 0.0.0.0, in both instances
- Refer to the JBoss documentation for creating users
- Access JBoss Management console on http://localhost:9990/ and login
- Now deploy master, router, search, rest, soap, webapi and workflow in one instance(MachineA) and enable it
- Deploy prod1.war in another instance (Machine) and enable it
- If we want to deploy another prod server rename to prod2.war in MachineC and update Components.xml with this Component.
Now you will be able to see that both JBoss instances are up and running.
Configure JBoss httpd Server
The JBoss httpd server or Web Server is an enterprise ready web server designed for medium and large applications. JBoss Web Server provides organizations with a single deployment platform for Java Server Pages (JSP) and Java Servlet technologies, PHP and CGI. It can be used as a high performance generic web server instead of common native web servers like Apache Httpd or IIS.
Now, we have seen how to configure Rollbase in both domain and standalone mode in JBoss. The next step is to configure the JBoss httpd server.
A JBoss httpd server was installed in any of the instances configured above. Here we are installing the httpd server in a JBoss instance. After installing the httpd server, follow the steps below to route incoming requests from the httpd server to JBoss instances (configure JBoss Workers in Apache to tell it how to route incoming requests to Rollbase):
- Unzip the JBoss httpd server in any of the Machines
- Go to <JWSHOME>\etc\httpd\conf. Modify httpd.conf file with below settings:
- Modify ServerRoot to the correct JWS Home location in the httpd.conf file in all occurrences
- Change the hostname and port on which httpd server listens
- Now switch to <JWSHOME>\etc\httpd\conf.d
- Mount all the Rollbase componentsas below:
JkMount /workflow master
JkMount /workflow/* master
JkMount /storage master
JkMount /storage/* master
JkMount /webapi master
JkMount /webapi/* master
JkMount /search master
JkMount /search/* master
JkMount /rest master
JkMount /rest/* master
JkMount /rss master
JkMount /rss/* master
JkMount /master master
JkMount /master/* master
JkMount /router master
JkMount /router/* master
JkMount /prod1 prod1
JkMount /prod1/* prod1
- Now switch to <JWSHOME>\etc\httpd\conf.d. Modify the workers.properties file with the below changes:
worker.master.type=ajp13
worker.master.host=<MachineA IP Address>worker.master.port=8009
worker.master.lbfactor=1
worker.master.socket_timeout=0
worker.master.socket_keepalive=1
worker.master.connection_pool_timeout=60
worker.master.connection_pool_size=300
worker.master.connection_pool_minsize=50worker.prod1.type=ajp13
worker.prod1.host= <MachineB IP Address>
worker.prod1.port=8009
worker.prod1.lbfactor=1
worker.prod1.socket_timeout=0
worker.prod1.socket_keepalive=1
worker.prod1.connection_pool_timeout=60
worker.prod1.connection_pool_size=300
worker.prod1.connection_pool_minsize=50
- Now start the httpd server. Ensure that the httpd server started with no errors.
- Now try by accessing Rollbase on the httpd server listener IP address and port:
Ex: http: //<httpdhostname>:<httpdportname>/router/login/login.jsp - Ensure you successfully login to Rollbase
- Select the Rollbase System Console Application system and ensure that all components are running successfully.
(Refer to JBoss httpd documentation for specific details.)
Giving You Options with the JBoss Cluster
Now that you can choose between Tomcat and JBoss, it's time to choose the best AppServer for your Rollbase app. In this blog post, we explained how to configure Rollbase on JBoss EAP 6.3 in both domain and standalone modes. We also provided steps to configure the JBoss httpd server.
We hope you found this tutorial helpful—as always, feel free to ask any questions in the comments below. And don't forget to check out what's new in the latest Rollbase release to stay on top of all our new upgrades, like decision services and more.


