Sitefinity Image Optimization Using Kraken.io

It's easy to optimize web page size and load time with Sitefinity. In this post, learn how you can integrate a tool like Kraken.io with Sitefinity for simple image optimization.
TL;DR The code showcased below in this blog post is available here. You can start using it right away by downloading the add-on and installing it to your Progress Sitefinity project.
Image Size Over the Years
Websites have come a long way since their inception in 1991. As technology has progressed, we’ve gradually pushed it in the direction of being more and more visually engaging. The modern web page must provide information, but in a way that is interesting for the user and will retain their attention. Thus, caught in a fierce competition, websites have increasingly come to rely on images and video as content. This of course has resulted in bigger and heavier pages over the years. In fact, based on information provided by httparchive.org, the average web page size was 702kb in 2010 compared to 3545kb in 2018.
Ouch… that’s some heavy visual engagement right there. We’re all painfully aware of why we need to optimize web page size and load time, but we’re required to deliver exceptional content at the same time. So, a struggle might ensue between content creators who add more media to pages and web developers who try to optimize them—at least, that’s what happened with our company websites here at Progress. On one occasion, we had a blog post with over 10 images, each of which was several MBs in size. When using a CMS, content creators rarely pay attention to image sizes, or page load optimization in general… nor should they, as their job is to create exceptional content.
So how do we improve the CMS to make the lives of both content editors and developers easier? Let’s build an image optimization module!
Kraken.io to the Rescue
There are services available, such as Kraken.io, which compress the image size while retaining the same image quality. The idea is to use such services and reduce the size of images before they are saved in Sitefinity. Luckily, Sitefinity provides a mechanism to plug into the file processing flow. The goal is to plug our optimization logic into the file processing flow, so that users don't have to do anything more than uploading their image.
Implementing the Kraken.io and Sitefinity Solution
 Create a new Sitefinity solution, containing one web app project. Add a separate project that will store our logic. The idea is to then create a NuGet package for easy installation and reusability. The full code is available here, so you can go and get it, and I’ll also be providing Gist links with the code for every step.
First, create a base class called ImageOptimizationProcessorBase that extends ProcessorBase and implements IInstallableFileProcessor. The point of the base class is to provide some common functionality that can be reused by image optimization file processors.
Gist: https://gist.github.com/yasen-yankov/0441e7554d05ca042a9b20bea67995df
The goal of the IInstallableFileProcessor is to create a contract for us, so that we can automatically install all image optimization file processors on project startup.
Gist: https://gist.github.com/yasen-yankov/becf25976289dc16b86d4e5ab3d8ac6c
Next, we’re going to build our Kraken.io image optimization processor. To do that, we’ll need to install the “kraken-net” NuGet package. After that, we’re going to create a new class called KrakenImageOptimizationProcessor that extends ImageOptimizationProcessorBase.
Gist: https://gist.github.com/yasen-yankov/9b3689b810d5410ff89aab8c8b1bffa8
Let’s add a startup class that will handle the registration of all image optimization processors. We currently have only one processor for Kraken.io, but the idea is that there can be different file processors for different image optimization services. We want to provide logic for automatic registration for all of them and allow the user to pick which one to configure. We’re basically automating the file processor registration described in the Sitefinity documentation.
Gist: https://gist.github.com/yasen-yankov/80c84f3492829181954d3783f553ca7f
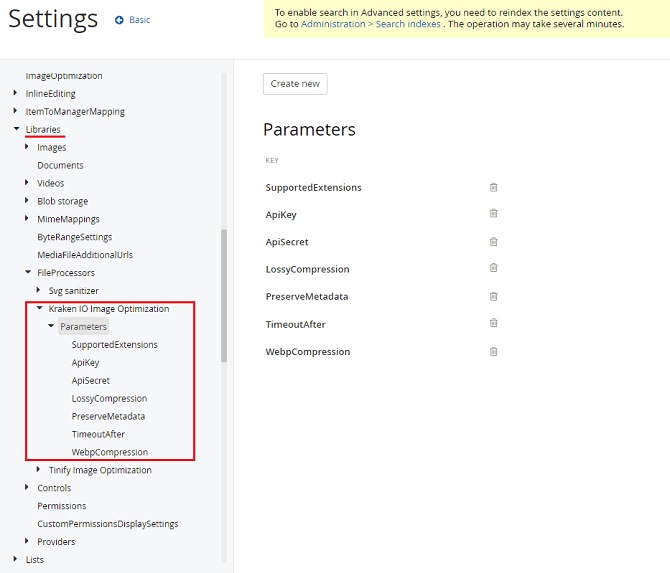
Let’s start our website and configure our Kraken image optimization processor. We can see that in Advanced settings, under Libraries we have a new configuration added for “Kraken IO Image Optimization.” We need to set the values for the ApiKey and ApiSecret parameters. You can get them from your Kraken account under the API Credentials section.

Testing Time
If you followed the above steps, it means that you are all set! Now, it’s time to upload an image and see how the optimization works.


Oooh weee! That’s some fine image optimization right there! Furthermore, it's all done seamlessly through the file processing flow and content editors don't need to think or know about it.
This is great, but you may ask, “What am I supposed do about already existing images?” Say no more! First, we are going to create our configuration file and resources that will be used to control the image optimization of existing images. Sitefinity provides a mechanism to create new configurations and custom resource classes and we are going to use that. For the custom configuration, create a new ImageOptimizationConfig class that inherits ConfigSection.
Gist: https://gist.github.com/tslazarov/78583417a18c04dbdce2b10b2cda833d
For the custom resource class, create a new ImageOptimizationResources class that inherits Resource.
We then need to register the configuration and resources in the Startup class we have created earlier.
Now that we have the configurations, the next thing we need to do is implement a functionality that tracks which images have been optimized. For that purpose, we need to create a new field that will persist that information. Create a new class called ImageOptimizationFieldBuilder that will have the logic for the field creation and will create a boolean field.
Call the method for field creation in the Bootstrapper_Bootstrapped method in the Startup class:
Once we have the new field, we still need to have a functionality that updates the field accordingly. For that purpose, we can use the events from the EventHub and subscribe to the IDataEvent where we can add the logic for field updates.
All good, but we still don’t have the functionality that updates the already existing images. We will create a new class called ImageOptimizationBackgroundProcessor that will process the images that are not marked as optimized
Lastly, we need to create a scheduled task and schedule it to be executed at a dedicated interval, which can be set in the configurations we have created:
The only thing left is to register the scheduling in the Startup class
And now, we have a working solution that will optimize both newly uploaded images and the already existing ones that have not been optimized.
The full Sitefinity Image Optimization Code Sample has been updated, with one more file processor added that utilizes the services of Tinify, another image optimization service.
If you’re new to Sitefinity and want to learn more, feel free to give it a try or schedule a demo.


