Using Powershell Authenticode Certificates to Self-Sign Application

One of the best ways to protect your servers and workstations from malware is to limit the execution of untrusted files. However, identifying each file on a system by either hash or path can be a significant amount of work and unmanageable to maintain. To provide scalability, whitelists and blacklists for software execution depend heavily on certificates to globally allow or disallow execution by category. Many companies, such as Microsoft, Adobe, Oracle, and McAfee will pre-sign their applications. But this is not always the case. Some vendors unfortunately, will provide unsigned code. This may also be true for applications developed in house. So how do we whitelist these applications? The answer is Powershell.
PowerShell has the ability to easily generate self-signed certificates to be utilized for code signing. The process involves generating a self-signed Root Certificate Authority as well as a code signing certificate. In order to do so, one must first install the Microsoft Software Development Kit (SDK). The Windows 10 SDK is available for download at the link below.
https://developer.microsoft.com/en-us/windows/downloads/windows-10-sdk
Generating a Self-Signed Trusted Root Certificate
The first step in generating self-signed test certificates to be utilized for code-signing is to generate a Trusted Root Certificate Authority (CA). The makecert.exe utility, installed as part of the Microsoft Software Development Kit (SDK), can be utilized to generate the test Root CA and test code-signing certificate.
The command to generate a test root certificate authority is described below.
makecert –n “CN=PowerShell Local Certificate Root” –a sha256 –eku 1.3.6.1.5.5.7.3.3 –r –sv root.pvk root.cer –ss Root –sr localMachine
A breakdown of the above command is as follows.
-n This parameter specifies the subject’s certificate name. It must conform to the X.500 standard.
-a Specifies the signature algorithm.
-eku Inserts a key usage object identifier in to the certificate. In this case, the 1.3.6.1.5.5.7.3.3 indicates that this is a code signing certificate.
-r Create a self-signed certificate
-sv Specifies the subject’s private key file
-ss Specifies the certificate store name. In this case Root refers to the “Trusted Root Certificate Authorities”
-sr specifies the certificate store location. In this case, it was the local machine.
Generating a Self-Signed Code Signing Certificate
The same application, makecert.exe can be used to generate the code signing certificate. The commands to generate a code signing certificate are described below.
makecert –pe –n “CN=PowerShell User” –ss MY –a sha256 –eku 1.3.6.1.5.5.7.3.3 –iv root.pvk –ic root.cer
A breakdown of the above command is as follows.
-pe Marks the generated private key as exportable
-n This parameter specifies the subject’s certificate name. It must conform to the X.500 standard.
-ss Specifies the certificate store name. In this case My refers to the “Personal Store”
-a Specifies the signature algorithm.
-eku Inserts a key usage object identifier in to the certificate. In this case, the 1.3.6.1.5.5.7.3.3 indicates that this is a code signing certificate.
-iv Specifies the issuer’s private key file
-Ic Specifies the issuer’s certificate file
Using the Certificates
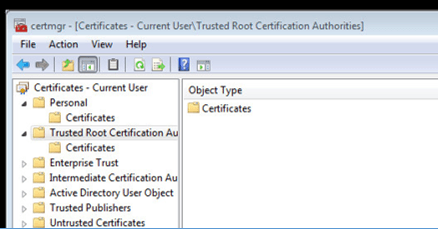
Once the Root CA and test code signing certificate have been created, the next step is to export each certificate so that it can be transferred to the environment that it will be protecting. To export certificates, open a command prompt as administrator and run certmgr.msc.
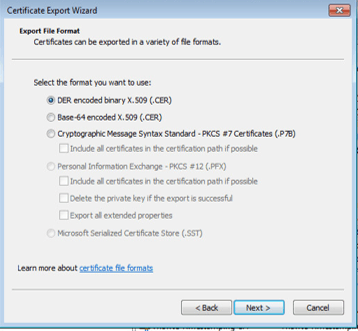
Once in the Certificate Manager, you will need to export the Trusted Root Certificate. To export the Trusted Root Certificate, go to the Trusted Root Certificate Authority folder and find the appropriate CA within the Certificates folder. Right click and go to All tasks | Export. When prompted, choose the radio button for the X.509 certificate. Continue until the export is complete.

Once in the Certificate Manager, you will need to export the Trusted Root Certificate. To export the Trusted Root Certificate, go to the Trusted Root Certificate Authority folder and find the appropriate CA within the Certificates folder. Right click and go to All tasks | Export. When prompted, choose the radio button for the X.509 certificate. Continue until the export is complete.

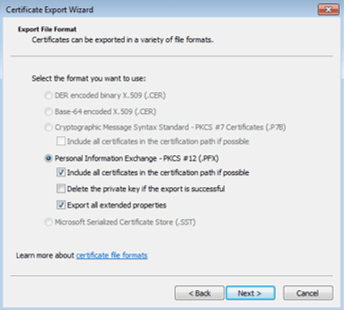
Next, to export the code signing certificate, go to the Personal folder and find the code signing certificate in the Certificates folder. Right-click and go to All tasks | export. When prompted, choose “yes” to export the private key. Choose to export the certificate as a Personal Information Exchange – PKCS #12 (.pfx). This is the only export format that allows the export of the private key. Choose to include all certificates in the path and export all extended properties.

Add a password for the private key. Finally, save the export. Move both of the above-exported files to the machine which houses the protected application.
Import the Certificates
The certificate and Root CA files must be imported on to the machine housing the protected application. On this machine once again, use the Windows run command to open certmgr.msc. Under the Personal key store, import the generated self-signed certificate. Under the Trusted Root CA key store, import the generated Root CA. To confirm that the key imported correctly and is correctly identified, open PowerShell as an administrator and run the following command.
ls cert:\CurrentUser\My –CodeSigningCert
Sign Your Application
The final step in the process is to sign your application. You will first load the certificate information in to a Powershell variable using the command below.
$cert = @(ls cert:\CurrentUser\My –CodeSigningCert)[0];
Next sign the application using the command below.
Set-AuthenticodeSignature c:\app.exe $cert
An example is shown below:

If you wish to sign all files within a particular directory, you can loop through the above with a script such as the below. Note that this will not overwrite an official code signature such as the one provided by Microsoft. It will simply be applied to unsigned applications.
param (

[Parameter (Mandatory=$true)][String]$path

)


$directory = Get-ChildItem -Path $path -recurse

$cert= @(ls Cert:\CurrentUser\MY -CodeSigningCert)[0]

foreach($file in $directory) {

$FullPath = $file.DirectoryName + "\" + $file.Name

write-host $fullPath

Set-AuthenticodeSignature $fullPath $cert

}
Combine a Signature with a Third-Party Tool to Manage Execution of Applications
Authenticode certificates can be combined with third-party applications such as a host intrusion prevention system (HIPS) or host whitelisting application to manage execution on your machine. One example is to combine self-signed certificates with the McAfee Endpoint Security (ENS) Access Protection feature. The instructions to create a rule in McAfee ENS are below.
Log in to the ePO server interface. Go to menu | Policy Catalog | McAfee Endpoint Security Threat Prevention | Access Protection.
Add a new AP Rule. Name it Block Execution if not signed by Trusted Signature.
- You will need to add both the signature that you created as well as any existing signers for trusted applications such as Microsoft, McAfee, or Oracle.
- Under Executable: Include the following directory: C:\whitelisted directory
- Under Executable: Exclude the Powershell Signer that you just created.
- Under Executable: Exclude the Microsoft Signature.
- Under Executable: Exclude any other trusted signers
- Under Subrules: Name a rule All Execution.
- Under Subrules: Subrule Type: Choose Files.
- Under Subrules: Check the “Execute” Box.
- Under Subrules: Include all Files (**).
To test your signature, try running one application of each type. Ensure that a Microsoft signed application runs. Ensure an application signed with your new Powershell signature executes. Finally attempt to run an unsigned application. This should be blocked.
This is just one of many ways to utilize the Powershell code signing feature. Good luck and happy coding!

