Rich-text editor customizations
The rich text editor is where the real action with content creation happens. Therefore, it is vital that content editors have all the tools they need right there – in the editor. Apart from the common formatting options, you can add and remove functionality (buttons) in the editing toolbar, and, play with the contextual toolsets for the content.
With the Admin App samples provided, you can easily add the following commonly used buttons to the rich text editor's toolbar:
- Word count
- Text alignment options per paragraph
When working with multilingual content that requires alternative text alignment, such as Arabic cultures, you can add functionality to the toolbar to switch text alignment from left to right per paragraph.
- Spell check
Sometimes a small mistake may cause big misunderstanding. Quickly checking whether your content is properly worded and punctuated is a button away. The spell check button enables content authors to perform spellcheck and fix issues on the go. All spelling-related issues are marked with yellow in the content. Upon clicking on a marked word, a custom contextual toolset (edit menu) is displayed, along with a proposed change and accept and reject buttons.
- Insert special characters
Yes, lots of times they are necessary. Special characters, symbols, mathematical formulas, you name it. With the help of this button, content editors can pick a character from a predefined list. Upon hovering over the symbol, a tooltip with the character definition is displayed. You can modify or replace the characters’ list altogether.


Let's talk content editing area. With the following samples, you can enable content editors to quickly make formatting fixes to selected text or visualize text pasted according to their requirements and preferences.
- Contextual menus for text selected
Everybody loves a shortcut for completing key operations on the go. With the help of this sample, you get a quick menu next to the text you select, for example, to make the text bold or superscript part of it. The sample comes with 6 key text operations: bold, italic, underline, superscript, subscript, and clear formatting. You can add in the quick menu any of the other buttons in the toolbar, be it the default ones or ones you implemented additionally. You can even customize further and add a dropdown button, say with options to choose a style for the text.
- Visualize text pasted
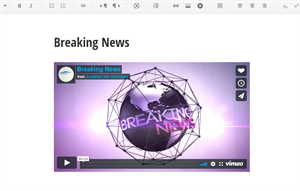
Yes, you can embed media, for example a YouTube link, and visualize it as a video in the content. With this sample, however, you can paste a link to (media) content that need not be coming from an iframe provider and configure how it is visualized. You do this by using the content provider API to create a custom service that identifies the source of the link, returns the markup, and transforms the link text into a visualization. Say you want the Vimeo link you paste to be visualized as a styled box with caption. Or, you want to enable job applicants to paste a LinkedIn profile link in their application, so that you get a framed thumbnail of their photo, position, and company. Keep in mind that you cannot modify the properties of the visualization as you modify the properties of embedded media.

For more information about the custom content editor extensions, see the respective GitHub repo.
Next steps
Every content has specifics and thus, specific requirements. You may consider adding any additional formatting and text editor functionality, such as find and replace, custom headings, text highlight color, font type, color, and size, and so on.
Say your team is creating blog posts with technical content. You may need to include functionality to add formatted formulae, code samples, or code blocks directly into the content. Or, you may need to browse and embed an item from an external digital asset library or stock photos library.
Suppose you are a technology content blogger publishing content that describes more complex conceptual information that would benefit from visual aid. Integrating with mind mapping, diagram sketching and drawing tools, such as XMind, gliffy, or draw.io will complement your content seamlessly.
Sitefinity-wise, you can go further by enabling content editors to insert templates for forms maps in the content, for example, forms, maps, or navigation. If editors need to embed a banner, as opposed to a plain jpeg file, they can do it by inserting HTML markup straight in the content.
In addition, you can modify the styling and settings of your content editing experience on a global level via the Kendo UI config file. For more information about the file, see Configure the Kendo editor. For an even greater flexibility, you can style everything with the help of code.