Add customizable grid widgets to MVC templates
You can leverage the set of grid widgets that help you customize your layout by dropping them on your pages. Each grid widget on a page forms one or several placeholders for your other widgets (depending on the page template).
You can find the Grid widgets section in the Page toolbox under Layout.
In the file system, grid widgets are located in the GridSystem/Templates folder of each resource package. You can use them only on pages and templates based on this specific package.
Bootstrap grid widgets markup corresponds to the markup of the grid system of the Bootstrap framework. For more information, see Bootstrap grid.
NOTE: Similarly, if you create a package, based on another CSS framework, you can use the classes of the framework's grid system in the grid widgets of your package.
For more information about resource packages, see Resource packages GitHub repository and Resource packages.
Create custom grid widgets
You can work with a variety of grid widgets, shipped with the Bootstrap package out-of-the-box. For a list of the default Bootstrap grid widgets, see the Bootstrap 5 GitHub repository. Each grid widget covers a basic grid column configuration via the Bootstrap grid CSS classes and markup. For more information, see Bootstrap grid.
For example, the grid-3+9 widget defines a Bootstrap row with two columns, the first one occupying 3 portions and the second one - 9 portions of the row. For more information, see
grid-3+9 template file.
The following code sample demonstrates the template of the grid-6+6 widget:
- sf_colsIn class
You need to define this class first because it creates a placeholder on the page and thus enables you to drop widgets in it.
- data-sf-element
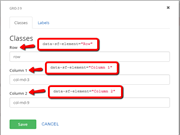
Enables you to add and remove classes from parts of the grid widget template. For example, you can add CSS classes to the rows and columns of a grid widget. Perform the following:
- Click Edit in the top right corner of the grid widget.
- Open the Classes tab.
You see all available CSS class fields for the columns and rows of the grid widget.
- Insert the required classes, so that they are added to their corresponding element.
You can use this attribute for your HTML elements added to the markup of a grid widget. To do so, place a data-sf-element property on the desired HTML element. The value of this property is the name of its CSS class field in the grid widget designer:

- data-placeholder-label
Sitefinity CMS enables you to add placeholder labels to grid widgets columns and rows in the Page editor. Thus, you can easily differentiate one grid widget from another after dropping them on a page.
To set a placeholder label to a grid widget column, open the widget designer and then the Labels tab page. You can see a field for each respective grid widget column. Enter a unique placeholder name for the column you want.
In some cases, you may want to set a unique label for your custom placeholders or other HTML elements in a grid widget. To do this, place a property on your HTML element. The value of this property corresponds to the name of the placeholder label field for your element in the tab page of the widget designer:

Rename grid widgets
You can rename a grid widget by renaming the corresponding file. Sitefinity CMS automatically renames the widget in the toolbox and on the pages where it is used.
Create and modify grid widgets
Based on the specifics of your scenario, you may need to modify a grid widget or you need to create a custom one.
To create a grid widget, perform the following:
- Copy a grid widget file from the /ResourcePackages/Bootstrap5/GridSystem/Templates folder. For example, copy the grid-6+6 widget.
- Navigate to /ResourcePackages/[Name-of-package]/GridSystem/Templates folder.
- Paste the grid-6+6 widget.
- Rename the widget - for example, MyGridWidget
- Open the widget for editing and modify the markup, based on your scenario.
- To create a placeholder in the UI from an HTML element, put the sf_colsIn class on the specific element.
To modify an existing grid, simply modify its markup based on your requirements.
Delete a grid widget file
In case you delete a grid widget file from the file system, an error message appears on the frontend. It informs that the template cannot be found. The widgets can no longer be displayed.
Responsive design and grid widgets
The responsive design of grid widgets depends on your implementation of the CSS framework you are using in your package. For example, the Bootstrap grid widgets are responsive because their markup is identical to the one of the Bootstrap grid system, which is responsive by default. For more information, see Bootstrap Grid system.
NOTE: The Bootstrap responsive design features are not supported, if you are working with the Minimal resource package.
You can leverage an additional responsive feature, included in the Navigation widget. For devices with smaller screens, you can display the navigation in a <select> tag (dropdown). Perform the following:
- Open the Navigation widget template.
NOTE: The template is located at /Bootstrap5/MVC/Views/Navigation/NavigationView.Horizontal.cshtml
- In the template file, locate the helper method
@Html.Action("GetView", new { viewName = "Dropdown", model= Model})
The method renders the <select> tag and is commented out by default, therefore you need to comment the helper method in.
- To use the <select> tag, modify its markup or use it in combination with the responsive utility classes of the Bootstrap package. To do that, modify the markup of
/Bootstrap5/MVC/Views/Navigation/Dropdown.cshtml file.