How to Quickly Configure Azure's Application Gateway with a Hybrid Data Pipeline Installation
Introduction
Accessing on-premises data from the cloud often brings with it many security and availability headaches, but with DataDirect Hybrid Data Pipeline it is now possible to securely access data behind any firewall while still leveraging the benefits of advanced cloud load balancing.
In this tutorial, you’ll learn how to quickly configure Azure’s Application Gateway to achieve both the scalability and reliability of a clustered Hybrid Data Pipeline installation by leveraging our support of the WebSockets protocol.
Important: This tutorial may contain outdated content. For the latest details on configuring Azure Application Gateway, please refer to Application Gateway configuration overview in the Azure Application Gateway documentation.
Download and Install a Hybrid Data Pipeline Cluster
This document assumes you are already familiar with installing a Hybrid Data Pipeline cluster on 2 or more Azure instances which meet the minimum requirements – including use of an external configuration database and shared storage. It also assumes familiarity with configuring VPCs, Networking and basic administration within the Azure environment.
General Information about installing a single node in Azure Cloud can be found here, while details on a cluster installation can be found in our Installation Guide.
Note that there are a few changes with the DataDirect Hybrid Data Pipeline installation specific to supporting cloud load balancers:
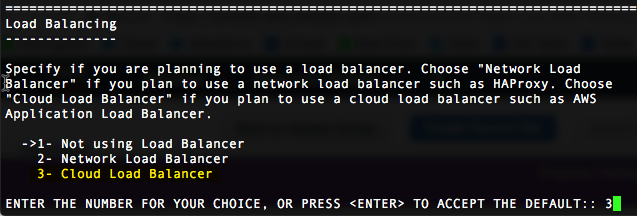
- There is a new option for Load Balancers. Be sure to choose option 3 if using a WebSockets based load balancer such as the Application Load Balancer.

- Make sure to load your PEM file (SSL cert) on the HDP server as well as on the Google Load Balancer. This ensure correct the redistributable files are created to support installation of the On-Premises Connector and hybrid ODBC/JDBC drivers.
- Ensure your “Load Balancing Host Name” matches the hostname in your SSL cert.
Configuring an Azure Application Gateway
- Create a new Application Gateway
- It needs to have access to your HDP Nodes on ports 8080, 11280 and 40501 via the internal private IP
- Basics
- Name: HDPGateway
- Settings
- Put into a Virtual Network or Create one
- Public IP
- Choose Public IP or create existing one
- Set Idle Timeout to 5 min
- Listener – HTTP on Port 80
- Leave rest of settings as default
- Wait until Gateway is fully created before continuing.


Configuring the Application Gateway Frontend Listener
- Create Listener (Basic)
- Name: HTTPS
- Frontend IP Config: appGatewayFrontendIP
- Frontend port:
- Name: HTTPS
- Port: 443
- Protocol: HTTPS
- Certificate:
- Load in PFX Cert
- Name: <domain name>
- Password: <password used when PFX was created>
- Wait until listener is fully created before proceeding

Configuring the Backend Pools and Health Probe
- Create Backend Pools
- Name: HDPServerPool
- Add all HDP Nodes to this pool
- Name: HDPNode1
- Add 1st HDP node to this pool
- Name: HDPNode2
- Add 2nd HDP node to this pool
- Add additional nodes for each HDP instance

- Name: HDPServerPool
- Configure Health Probe
- Name: HDPHealthProbe
- Protocol: HTTP
- Select “Pick host name from backend settings”
- Path: /api/healthcheck
- Interval: 30
- Timeout: 30
- Unhealthy: 3

- Configure HTTP Settings
- Edit existing “appGatewayBackendHttpSettings”
- Port: 8080
- Protocol: HTTP
- Cookie based affinity: Enabled
- Connection draining: Disabled
- Request timeout: 30
- Add “OPA”
- Port 40501
- Protocol: HTTP
- Cookie based affinity: Disabled
- Connection draining: Disabled
- Request timeout: 20
- Add “Notification”
- Port 11280
- Protocol: HTTP
- Cookie based affinity: Disabled
- Connection draining: Disabled
- Request timeout: 20
- Edit existing “appGatewayBackendHttpSettings”

Configuring Routing Rules
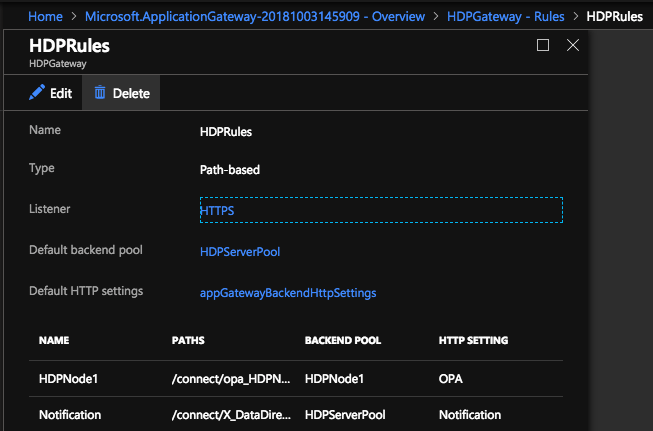
- Configure Rules
- Create Path-Based Rule
- Name: HDPRules
- Listener: HTTPS
- Default backend pool: HDPServerPool
- Default HTTP Settings: appGatewayBackendHttpSettings
- Add Configuration:
- HDPNode1 (Create one of these rules for EVERY node)
- Name: HDPNode1
- Path: /connect/opa_<hostname provided during HDP install>_40501
- BE SURE TO REPLACE dots with underscores in hostname
- Backend pool: HDPNode1
- HTTP Settings: OPA_Node1
- Notification
- Name: Notification
- Path: /connect/X_DataDirect_Notification_Server
- HTTP Settings: Notification_Pool
- HDPNode1 (Create one of these rules for EVERY node)

- Delete default listener
- appGatewayHttpListener on port 80 can be removed.
- Delete default backend pool
- appGatewayBackendPool
- Add the front-end IP address of the Application Gateway to DNS as an A-Record. This will vary depending on where your DNS records are managed.
We hope this tutorial assisted in creating a cloud-based solution to OData enable both your on-premises and cloud data sources using Progress Hybrid Data Pipeline and Azure’s Application Gateway. Now you can have security, scalability and reliability all together in a single data access solution which lets you bring sources such as Oracle, Postgres, MySQL, DB2 and SQL Server out from behind the firewall. If you have any question, please feel free to contact us.