JDBC TUTORIAL
Connect to Redshift, Salesforce and others from Apache Airflow
Updated: 02 Dec 2024
Introduction
Apache Airflow allows you to programmatically author, schedule and monitor workflows as directed acyclic graphs (DAGs) of tasks. It helps you to automate scripts to do various tasks.
In this tutorial, we are going to show you how you can easily connect to an Amazon Redshift instance from Apache Airflow. You can use same procedure to connect to any of your data sources, including Salesforce, using a Progress DataDirect JDBC Driver.
Prerequisites
- You should have an Airflow instance up and running. If you do not have one, please follow the steps in the quick start.
- Make sure you have the airflow web server as well as airflow scheduler up and running.
- Set the environment variable AIRFLOW_HOME=/home/<user>/airflow/
- Create folder named “dags” in the path /home/<user>/airflow/
Download and Install Amazon Redshift JDBC driver
- Download the Progress DataDirect Redshift JDBC driver.
- After the download has completed, unzip the package PROGRESS_DATADIRECT_JDBC_REDSHIFT_ALL.zip to extract the files to a folder.
- Run the installer to install the JDBC driver by running the below command
java -jar PROGRESS_DATADIRECT_JDBC_INSTALL.jar
- If you would like to change the installation folder, you can do so during the installation process.
- Complete the installation by following the prompts on your terminal/screen.
Configure Connections in AirFlow
- Open the Airflow Web UI. In the Admin tab open the Connections.
- Go to the Create tab and create a connection to Redshift using the Progress DataDirect Redshift driver you just installed as shown below.
- Conn Id: Redshift
- Conn Type: Jdbc Connection
- Connection URL: jdbc:datadirect:redshift://redshiftdemo.ckeivysqbpra.us-east-1.redshift.amazonaws.com:5439;Databasename=datadirect
- Login: <Redshift username>
- Password: <Redshift Password>
- Driver Path: /<path to datadirect Redshift install path>/lib/redshift.jar
- Driver Class: com.ddtek.jdbc.redshift.RedshiftDriver
- Click on Save.
Creating DAG
- For this tutorial, we will read data from a Redshift instance and display the records in DAG logs.
- Below is the DAG Python program. Save it to a Python file, for example datadirect-demo.py to a /home/<user>/airflow/dags/ folder. Alternatively, you can access the code on GitHub.
fromdatetimeimporttimedeltaimportairflowimportosimportcsvfromairflowimportDAGfromairflow.operators.python_operatorimportPythonOperatorfromairflow.operators.dummy_operatorimportDummyOperatorfromairflow.hooks.jdbc_hookimportJdbcHook#Creating JDBC connection using Conn IDJdbcConn=JdbcHook(jdbc_conn_id='Redshift')defgetconnection():JdbcConn.get_connection('Redshift')print("connected")defwriterrecords():id=JdbcConn.get_records(sql="SELECT * FROM customer")with open('records.csv','w') as csvFile:writer=csv.writer(csvFile)writer.writerows(id)defdisplyrecords():with open('records.csv','rt')as f:data=csv.reader(f)forrowindata:print(row)default_args={'owner':'airflow','depends_on_past':False,'start_date': airflow.utils.dates.days_ago(2),'email': ['airflow@example.com'],'email_on_failure':False,'email_on_retry':False,'retries':1,'retry_delay': timedelta(minutes=5),# 'queue': 'bash_queue',# 'pool': 'backfill',# 'priority_weight': 10,# 'end_date': datetime(2016, 1, 1),}dag=DAG('datadirect_sample', default_args=default_args,schedule_interval="@daily")t1=PythonOperator(task_id='getconnection',python_callable=getconnection,dag=dag,)t2=PythonOperator(task_id='WriteRecords',python_callable=writerrecords,dag=dag,)t3=PythonOperator(task_id='DisplayRecords',python_callable=displyrecords,dag=dag,)t1 >> t2 >> t3
Running the DAG
- On the Airflow Web UI, you should see the DAG as shown below.
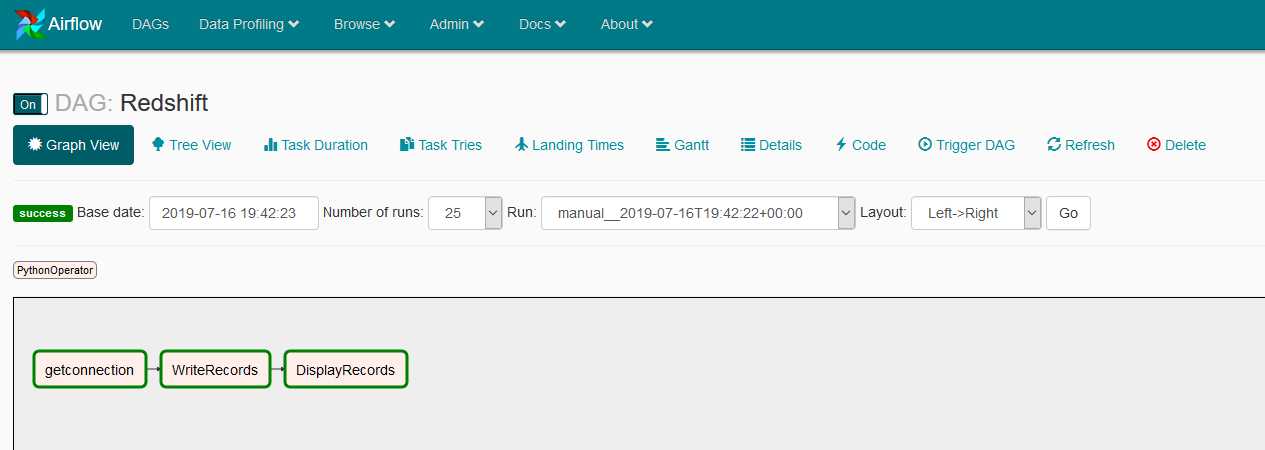
- Click on the trigger button under links to manually trigger it. Once the DAG has started, go to the graph view to see the status of each individual task. All the tasks should be green to confirm proper execution.

- After the execution, if you click on the task DisplayRecords and go to logs, you should see all your data printed in there as shown below.
We hope this tutorial helped you to get started with how you can access Amazon Redshift data from Apache Airflow. Please contact us if you need help or have any questions.


