MongoDB JDBC Driver for Data Integration with Yellowfin
Connecting MongoDB with Yellowfin via MongoDB JDBC Driver
Yellowfin makes business intelligence easy for anyone, from small business to massive enterprises. Here’s how to configure it with DataDirect JDBC connectors.
Basic Commands and Server Log-In Information
Start Server - <Yellowfin Home>\appserver\bin\startup.bat
Stop Server - <Yellowfin Home>\appserver\bin\shutdown.bat
Connect to Yellowfin server - http://<Computer Name>:<Port Number>
•<ComputerName> is the name of the machine on which Yellowfin was installed
•<Port Number> is the port chosen during installation (port 8080 by default).
Once you are at the home page, you can login with the user credentials below:
•User name: admin@yellowfin.com.au
•Password: test

Adding Progress DataDirect JDBC Connection Drivers
This example shows how to configure a connect for JDBC MongoDB driver. Other DataDirect JDBC drivers will follow a similar format.
How to add additional Progress DataDirect drivers:
- Copy the JDBC driver JAR file(s) into the Yellowfin/appserver/webapps/ROOT/WEB-INF/lib/ directory.
- Edit the file Yellowfin/appserver/webapps/ROOT/WEB-INF/web.xml. Add the class name of the DataDirect driver to the list in the JDBCDrivers parameter.
<init-param>
<param-name>JDBCDrivers</param-name>
<param-value>
com.connectioncloud.jdbc.Driver,
jp.co.mdit.aql.jdbc.AqlDriver,
net.sourceforge.jtds.jdbc.Driver,
.
.
.
com.treasuredata.jdbc.TreasureDataDriver,
com.facebook.presto.jdbc.PrestoDriver,
com.pb.spectrum.jdbc.driver.BIDataStoreDriver, ß Be sure to add comma at end of previous line
com.ddtek.jdbc.mongodb.MongoDBDriver ß Driver class added for Mongo DB driver
</param-value>
</init-param>
- Restart the Yellowfin server for the new driver to become available.
- Log into the Yellowfin server. On the Yellowfin homepage, select "Administration" and then "Admin Console."

- Select "Data Sources" and then "Add."
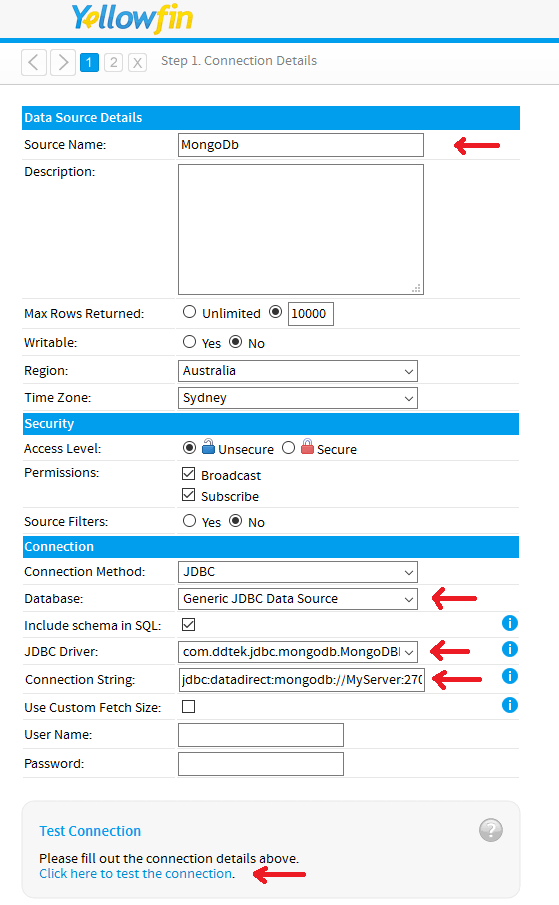
- Configure the data source.
Source Name: MongoDB (Any name is good)
Database: Generic JDBC data source
JDBC driver: com.ddtek.jdbc.mongodb.MongoDBDriver
Connection String: jdbc:datadirect:mongodb://<MyServer>:27017; SchemaDefinition= C:\\<PathToMappingFiles>\\MyServer.config;
User Name: xxxxxx
Password: xxxxxx
Note: In this example, the user name and password were not required for a connection to MongoDB.

- Select “Click here to test the connection.”
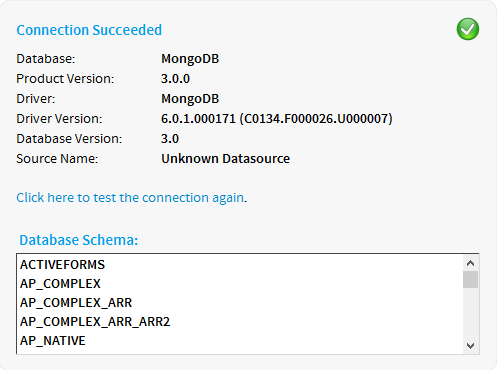
A successful connection will display the database name and metadata information.

At this point, Yellowfin reports can be built using the new data source.
To edit a current data source, select "Data Sources" and then click on the data source to edit.
All finished
MongoDB connectivity via JDBC or ODBC is easier than ever with DataDirect JDBC and ODBC connectors for MongoDB. Integrate your MongoDB data without having to duplicate data or flatten complex documents. Visit our information page to learn more.
Try Now