Using Kinvey Collections to Deliver Serverless Apps at Scale

Progress Kinvey is a feature-packed high productivity platform designed to help you build apps quickly. In the next post in this guide, learn how to navigate collections to manage your data and develop apps quickly on Kinvey.
As I discussed in the previous tutorial, a Kinvey collection is, in simple terms, a cloud data store. But a Kinvey collection is much more powerful as, for example, it can be connected to remote data via a REST API or via an enterprise data source such as Microsoft SQL Server. However, in this tutorial let’s just cover the basics of creating and using a collection to get ourselves more comfortable with how they work.
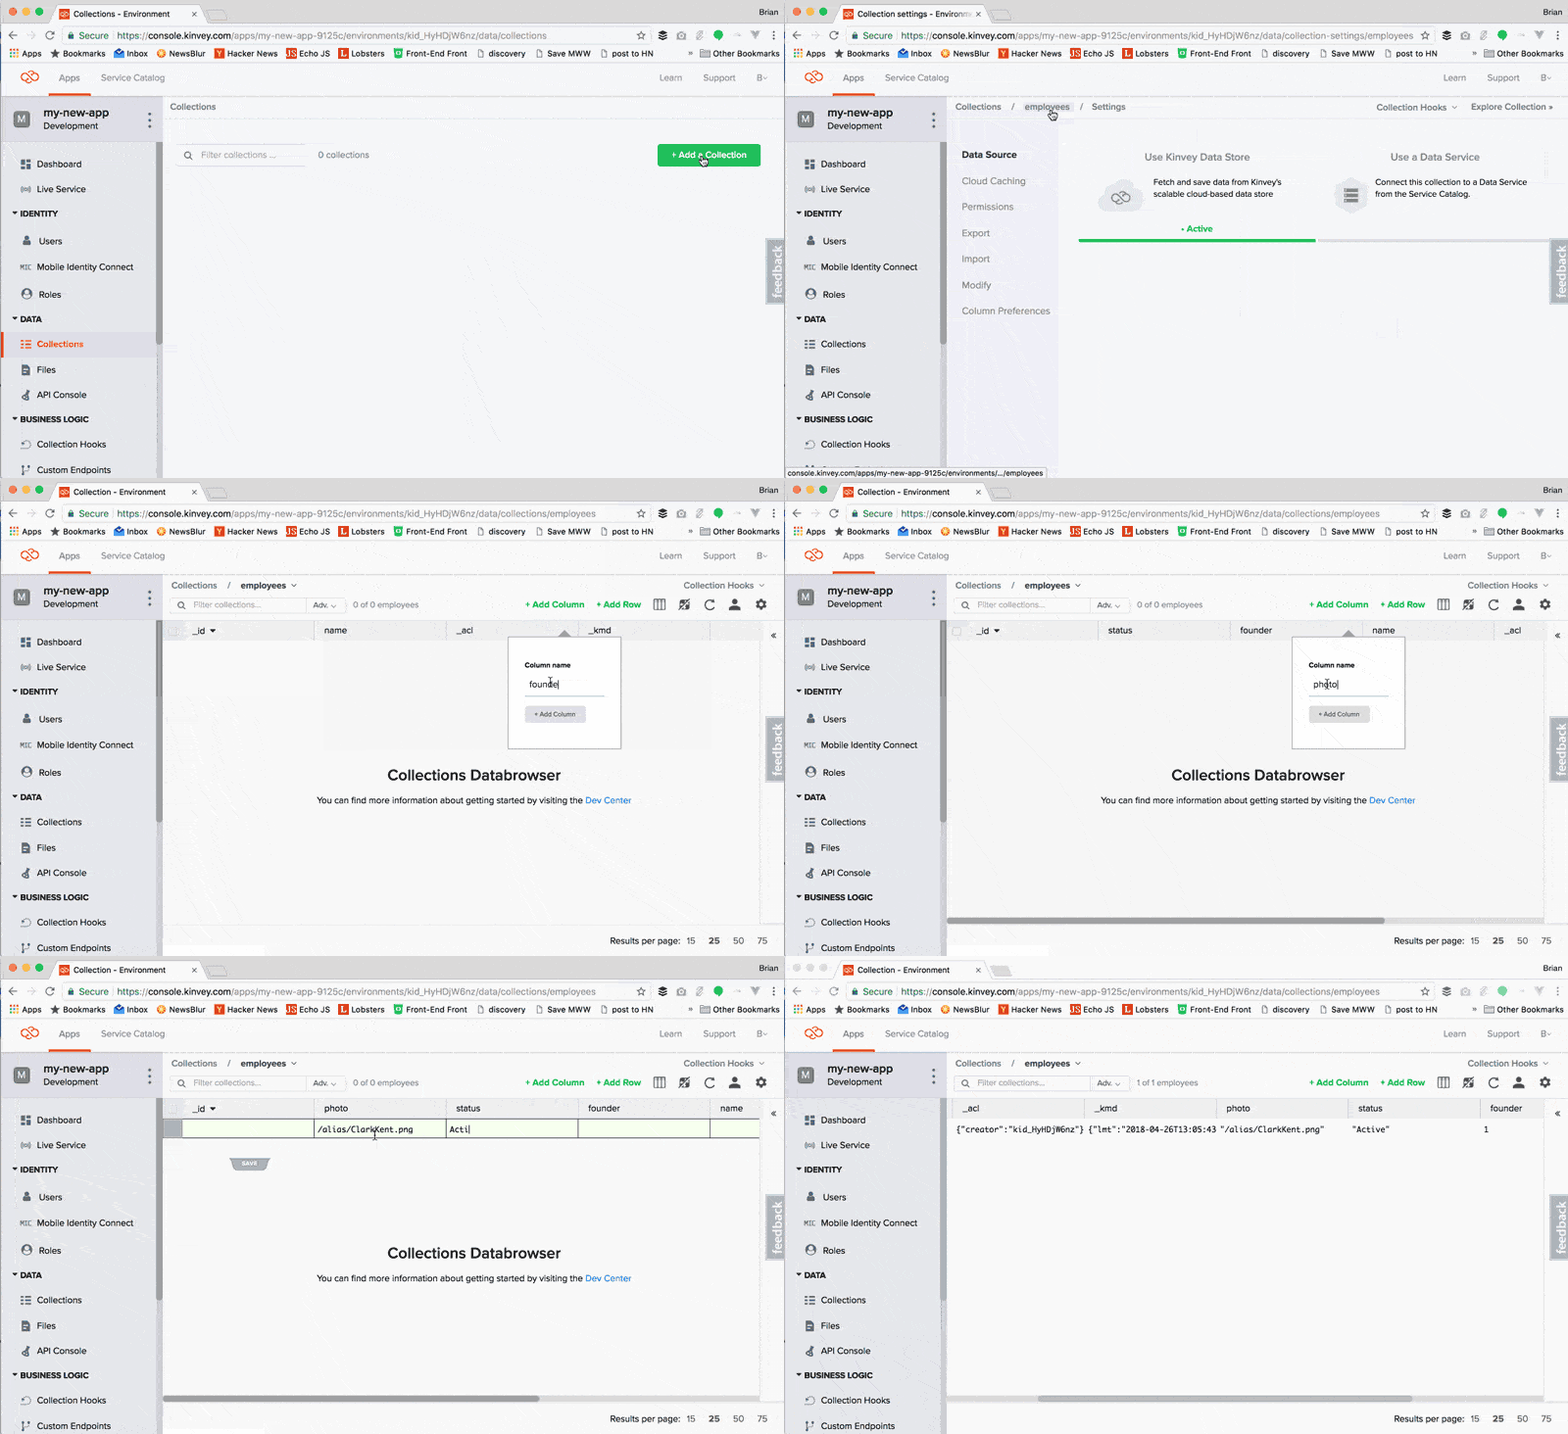
Let's start by creating a new collection called "employees" that will contain our data. In the Kinvey console, click the "Add a collection" button, enter the name "employees" and click "Save." Once the collection is created, you'll see a bunch of settings for the collection—let's not worry about those right now. Instead, let's add some columns and some data manually.
Click on the collection name (i.e. "employees") in the breadcrumbs links near the top of the page. Click the "Add Column" button and then click into the dialog box and enter the column name "name." Repeat this for three more columns: "founder," "status" and "photo."
Now let's manually add some data. Click on the "Add Row" button, then click into the row and add some data for "name," "founder," "status" and "photo"—the particulars of the data you enter don't matter right now.

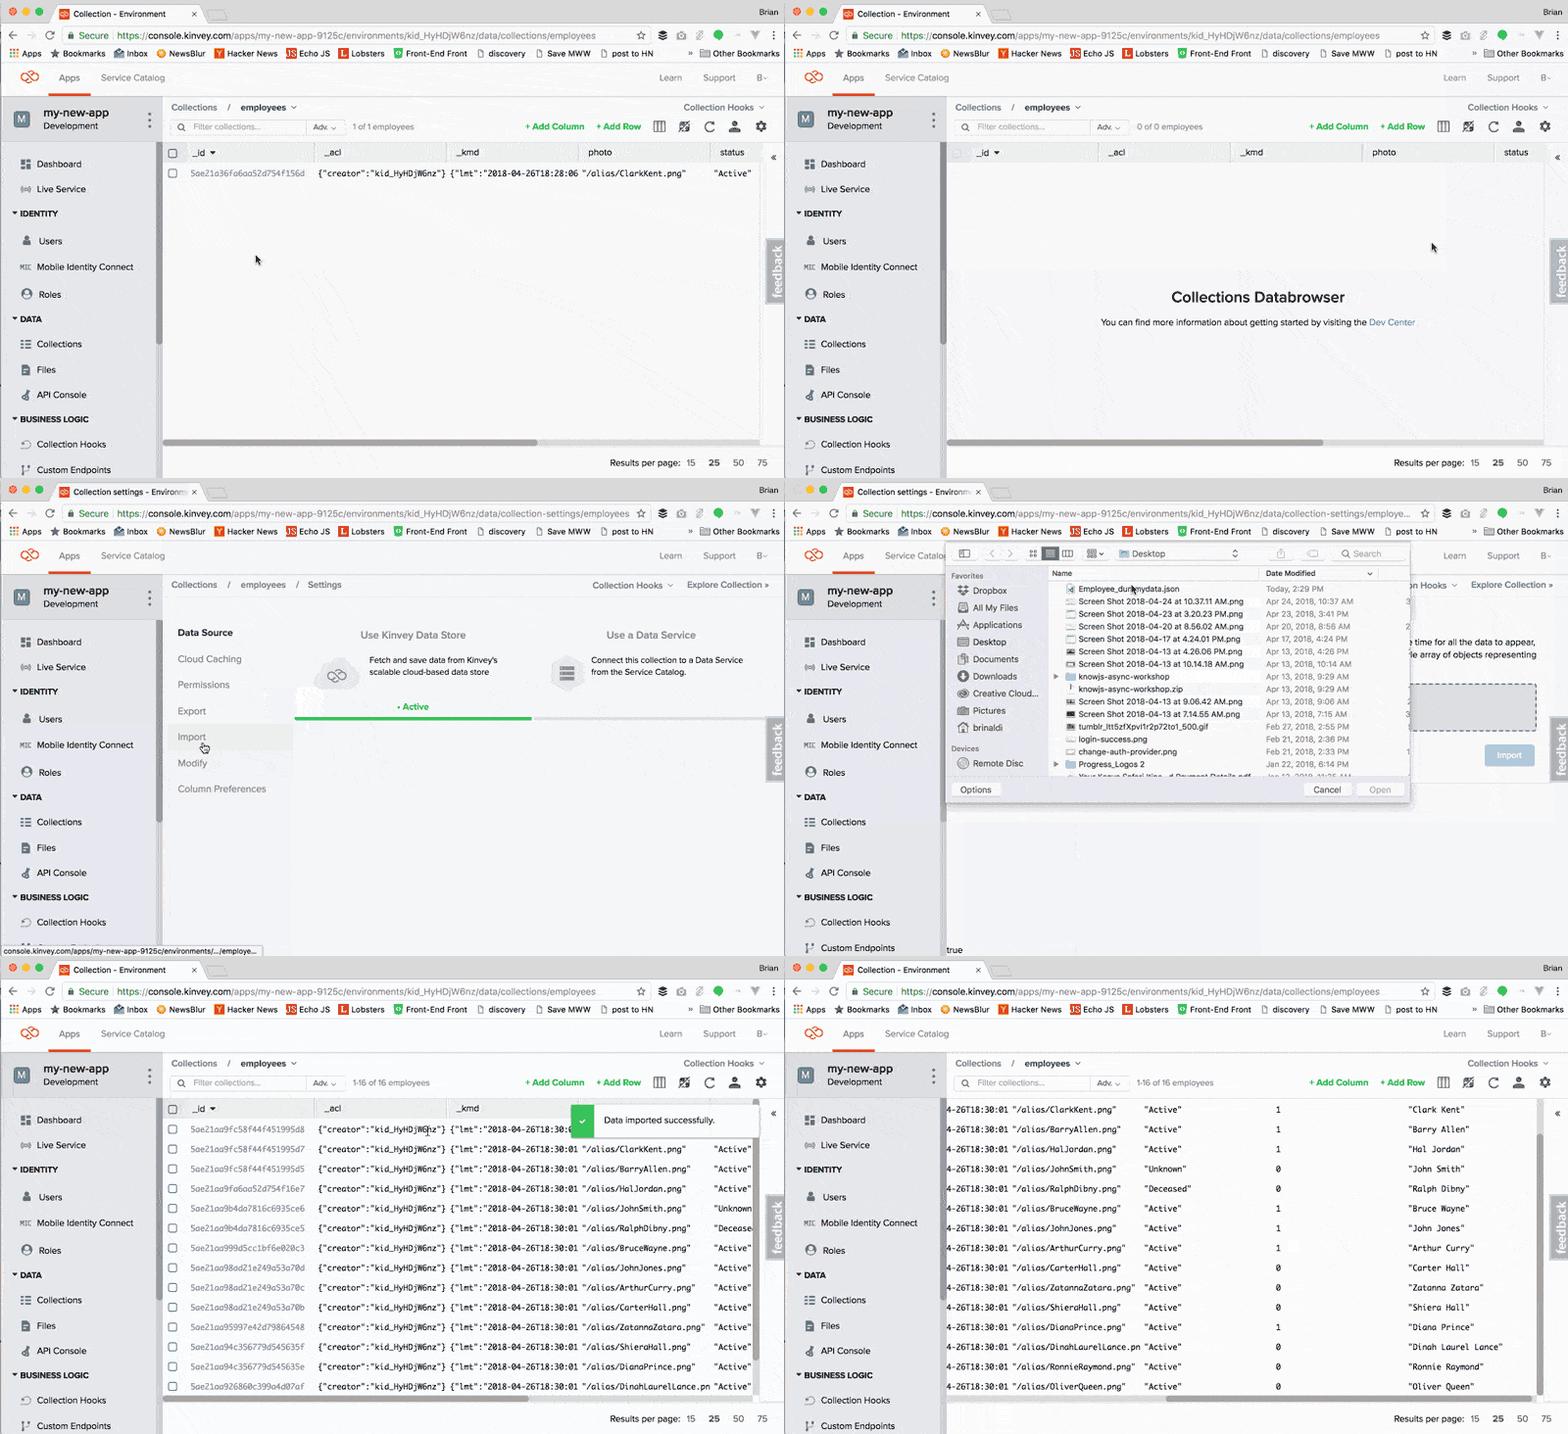
As you may have noticed, while this works, this isn't a very efficient way of entering data. Typically, you'd enter data via code or, alternatively, import it. Let's remove this data and import some new data. To delete the row, click the checkbox in the leftmost column of the data grid and then press the "Delete" button in the options that appear to the right. Next, click on the settings icon (the gear in the upper-right-hand corner) then choose the "Import" menu item. Select the file and click "Import." (NOTE: you can download the file here.)

Finally, now that we have some data, let's write some code to query it. The code I will be using for these examples is written in JavaScript so that we can run these easily in the browser, but keep in mind that the various SDKs generally have compatible APIs. So regardless of what SDK you are using, your code should remain similar.
Assuming our page has imported the HTML5 SDK from the CDN, the first thing we need to do is establish our connection to Kinvey. Let's look at the code to do this:
const client = Kinvey.init({ appKey: 'kid_HyHDjW6nz', appSecret: '5dad0a434cbf40549ff926c577403e54'});
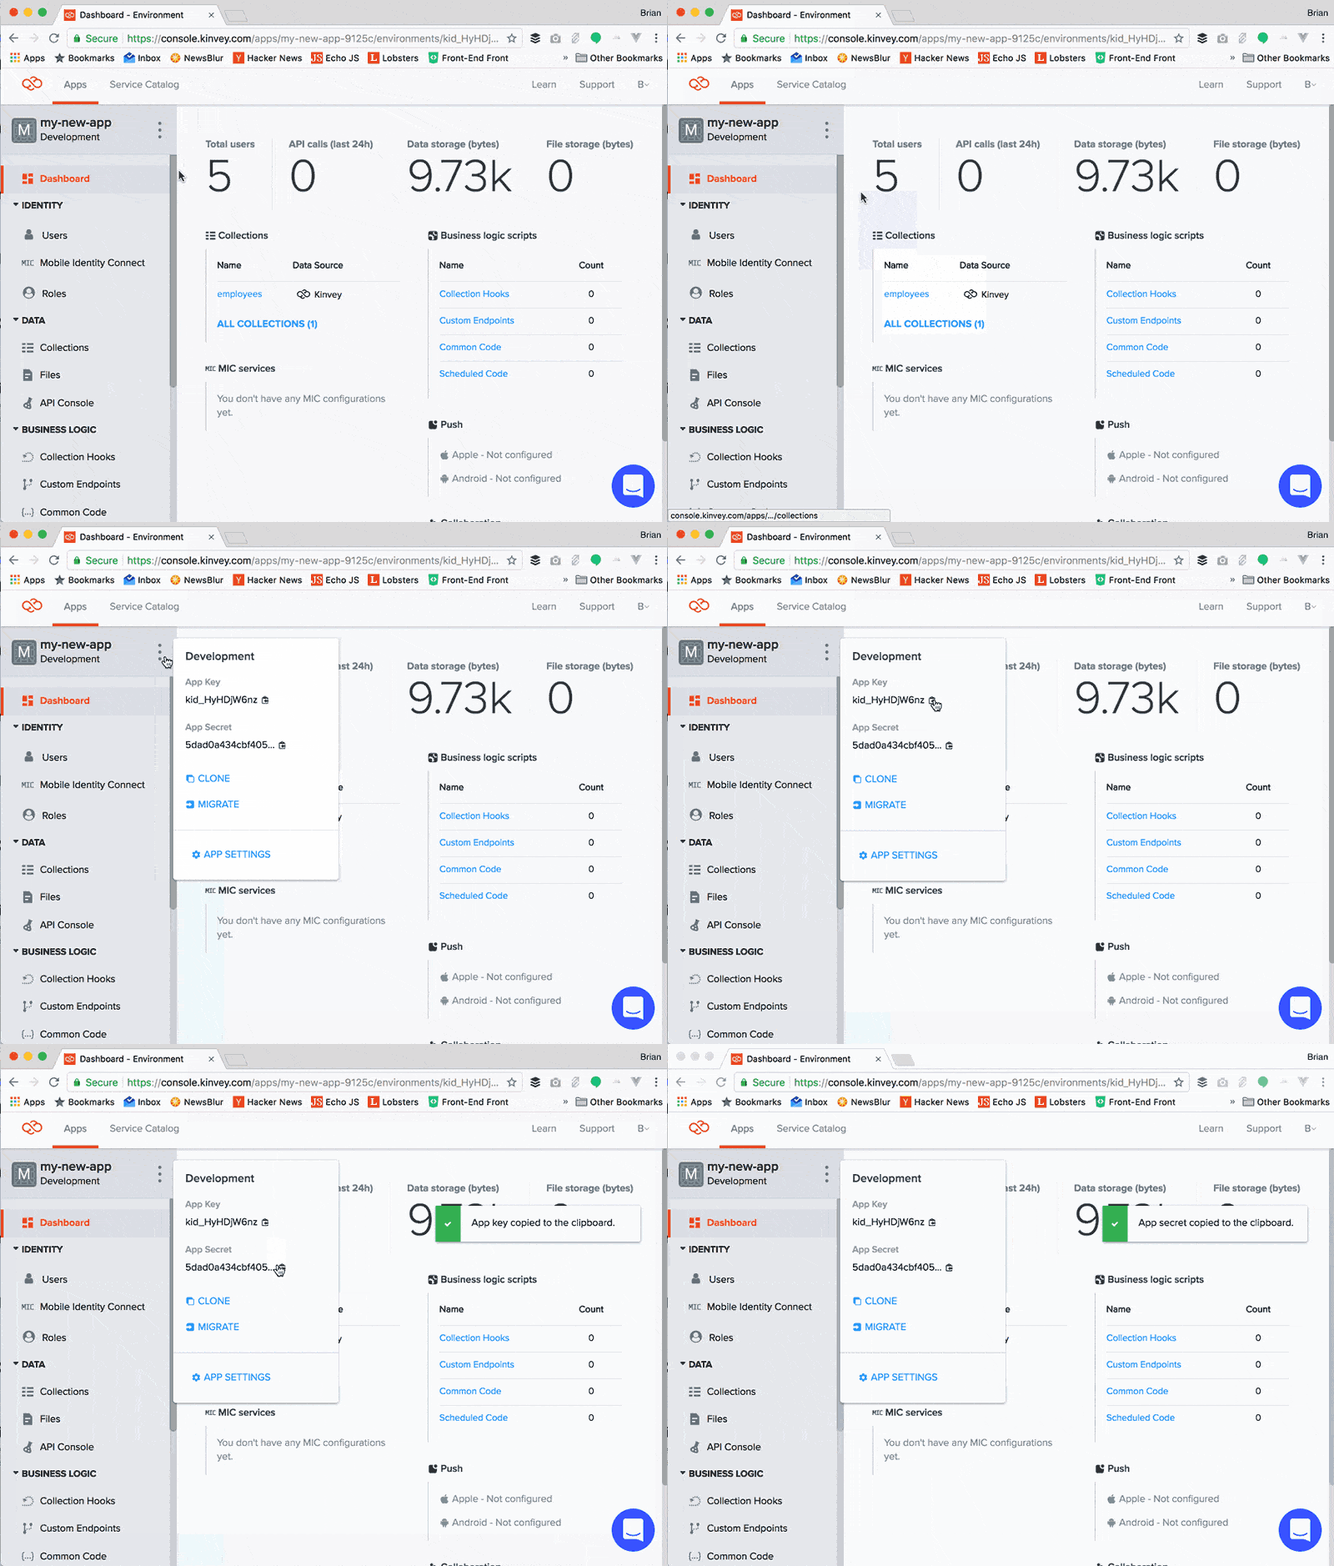
You may be wondering, where do I get the values for appKey and appSecret? You can find these in the console by clicking next to the app name in the upper left corner of the screen.

Kinvey has the concept of an "active user," which is the user that is authenticated to access the data and other information on the Kinvey app. This can be an anonymous user, which is what we'll use for our sample.
Start by getting the active user. This will be empty if one hasn't been established yet.
const activeUser = Kinvey.User.getActiveUser(client);
Now let's check if the user exists and, if not, establish an anonymous active user with Kinvey. Once this is done, we'll call the loadDataStore() method that will pull the data from the collection:
if (!activeUser) { Kinvey.User.signup() .then(() => { loadDataStore(); }) .catch((error) => { console.log(error); });} else { loadDataStore();}
I should note that we're using an anonymous user here for the sake of simplicity of the example, but, for your web app, we suggest creating a generic user with default permissions in this scenario.
Now that we have the user, let's take a look at the loadDataStore() function that gets the data:
function loadDataStore() { const dataStore = Kinvey.DataStore.collection('employees'); const stream = dataStore.find(); stream.subscribe( (employees) => { console.log('data retrieved'); const el = document.getElementById('allEmployees'); el.innerHTML = ''; employees.forEach((employee) => { el.innerHTML += ` <li> <img src="https://raw.githubusercontent.com/remotesynth/kinvey-data-connect-sample/master/images${employee.photo}"> <h3>${employee.name}</h3> <p>Status: ${employee.status}</p> </li>`; }); }, (error) => { console.log(error); } );}
There's a lot going on here, but the key elements to understand are that the dataStore variable in the sample establishes the connection to the employees collection in Kinvey. Calling the find() method with no parameters will retrieve all of the records - well, technically the first ten thousand entities or 100 MB of data, but in our case that restriction doesn't apply. The find() method uses the observable pattern, so we'll subscribe to the next method within this observable to stream the data and the error method in case something goes wrong. When the next method is called, we're just looping through the records returned and outputting the data to the browser via a HTML template.
Let's look at the result:
And there we go! Collections can look a bit tricky at first, but they are incredibly useful tools, and the Kinvey console gives developers more productivity than they might otherwise have. There’s a lot more you can do with Kinvey, but I hope this gives you a place to start.
Much More
One important thing to remember as you get started is that Kinvey is a serverless high productivity platform—developers who use it don’t have to worry about infrastructure, they can just focus on innovation. To learn more about what serverless means for developers, check out this blog post.
Obviously we're still working through the basics of what Kinvey can do, but hopefully this gives you what you need to keep exploring and dig deeper.
As I mentioned above, this posts builds on a previous post in this series that can help you navigate the console to get going in Kinvey, so be sure to check it out if you haven't. Or for a hands-on approach, feel free to sign up for a free trial and check it out today.

