Personalize pages
NOTE: Sitefinity Digital Experience Cloud (DEC) was renamed to Sitefinity Insight as a part of the Sitefinity 13.0 release. However, Sitefinity CMS and its documentation prior to version 13.0 continue using the former name - Digital Experience Cloud.
Personalizing a page gives you the opportunity to serve different content to different types of users (user segments). You can build set of rules on which the user segments are based. You can then create different versions of the pages of your website.
You must first create the user segments and then personalize your pages. You can then use the personalization preview tool to view the website from different user perspectives.
Personalizing a page means that you create one or more different versions of a page. These versions are associated with the user segments you have created.
PREREQUISITES: You have created one or more user segments. For more information, see Personalization of the website content.
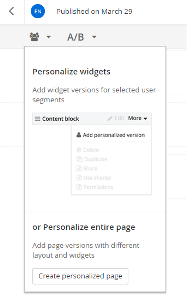
- To personalize a page, open the page for editing and in the personalization menu, click the Create personalized page button :

- The Create a personalized page screen is displayed.
- In the dropdown box, select the user segment that will see this personalized version of the page.
- Click Create and go to edit content.
The page opens in page editing mode.
Initially the personalized page is an exact copy of the original page.
- You can use the page editing mode to customize the layout of the page, add content by editing widgets, change the template, or apply themes.
For more information, see Modifying the layout, Add widgets on your page or template, and Applying a template to a page.
- After you have personalized your page, perform procedure Setting the status of a new page or content item.
NOTE: The original page, as well as all of its personalized versions cannot have different statuses.
For example, if you publish a personalized version of the page, the page and all of its versions are also published.
If you want to view the entire site from the perspective of a user segment, you can use the Personalization preview tool.
Delete a personalized version of a page
-
On Pages page, open the page whose personalized version you want to delete.
- From the page editing screen, do one of the following:
- Expand the personalization dropdown menu, hover over the personalized version of the page you want to delete, and click
 .
.
- Open the personalized version of the page for editing, expand the Actions menu
 and choose Delete.
Viewing a page and all the personalized versions of a page
To display a particular page in a browser, on Pages page, click the View link of the respective page.
If a page is personalized, when in editing mode, in the page menu, click the Preview this page as... link:

You can now view the entire site from the perspective of a user segment, you can use the Use the personalization preview tool.
Viewing personalization reports in Digital Experience Cloud
Having personalized a page, you can directly access personalization reports in Digital Experience Cloud to measure and analyze the results of your personalization campaigns and how they influence conversions. Access the reports by clicking the Go to report link next to your page. For more information, see Personalization reports.
NOTE: Reports are generated only after there are visits to a personalized version of the page. In addition, reports are associated to the page content itself, not to its URL address. That is, a page may have multiple URLs that open the same content. For more information, see Administration: Add additional URLs to a page.