Connect your sites to Sitefinity Insight
Overview
In this article, you learn how to connect your Sitefinity CMS sites to Sitefinity Insight data centers.
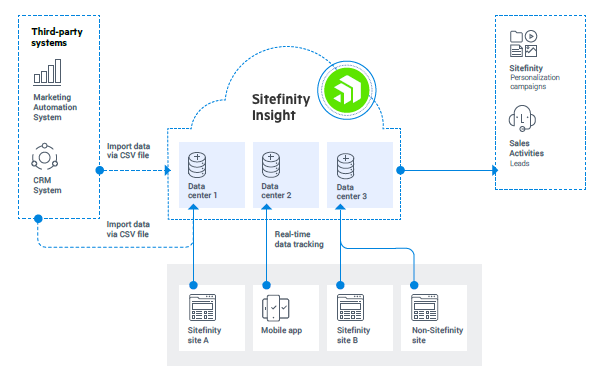
The following chart summarizes the relationship and information flow between Sitefinity CMS and Sitefinity Insight. Because information in Sitefinity Insight is always stored and processed in a particular data center, you need organize the relationship between your Sitefinity CMS sites, Sitefinity Insight data centers, and, if any, third-party systems. You have the flexibility to store and organize your marketing data as required. For example, in a single Sitefinity data center, you can combine data from your Sitefinity CMS site and mobile apps or combine data from your sites and third-party marketing automation system. For more information, see Data integration and data imports.
RECOMMENDATION: We recommend connecting each Sitefinity CMS instance separately to a specific data center in Sitefinity Insight. If you are working in multisite mode, you can choose a specific data center to track each of the sites. This enables you to track the sites separately.
Sitefinity Insight data centers and data sources:

Access keys
PREREQUISITES: To establish a connection and generate access keys, you need to use Sitefinity Insight Account Administrator account, thus having access to all data centers and permissions to manage data centers within the account.
To secure the connection between Sitefinity CMS and data centers, Sitefinity Insight uses access keys as an authentication mechanism. Each access key is a JSON Web token, which uniquely identifies each connection to Sitefinity CMS, or any specific site or instance. An access key expires only after you deactivate it manually.
Generate access keys
Access keys are generated in the Sitefinity Insight Administration dashboard, and upon configuring your Insight connector in Sitefinity CMS, you use them to establish the connection.
To generate an access key:
- Open the Insight Administration dashboard and click Access keys.
- Click Generate access key.
- Enter a name that will help you identify the key in the list with other keys, for example, Product site.
- Define the level of access this key will grant upon connection to Sitefinity CMS:
- Click Generate.
- Copy the generated key.
IMPORTANT: After you close the window, you will not be able to see this key again. Make sure you have a copy of the key in a secure place.
Manage access keys
PREREQUISITES: To manage access keys, you need to use Sitefinity Insight Account Administrator account, thus having access to all data centers and permissions to manage data centers within the account.
Navigate to the Administration dashboard » Access keys to see a list of all generated keys, as well as details about the access they grant and when were the keys generated.
By clicking on the  (Actions) button, you can also:
- Deactivate key
Connection to Sitefinity CMS is lost and your sites will no longer be tracked.
- Change access
Change the level of permission for this connection.
You can also switch the key list tabs to display either all Active or Deactivated keys.
NOTE: When you are creating new data centers, do not forget to update the access key permissions so that access is granted to the newly created data centers. If you already granted access to all data centers, you do not have to change anything.
Use access keys in Sitefinity CMS
You can now use this key to connect Sitefinity CMS to Sitefinity Insight. For more information, see Connect to Sitefinity Insight.