Sample: Sitefinity data widget

Overview

In many cases custom widgets need to get and display some items from the Sitefinity CMS backend. Use this sample to create a widget that consumes data from Sitefinity CMS. This sample works with the IRestClient to access data from Sitefinity CMS.

This sample works with a news, but you can work with other types of content from Sitefinity CMS, such as content blocks, blogs, blog posts, media, and dynamic items, etc. The WebServicePath configuration in the Renderer’s the appsettings.json controls which service the client work with.

PREREQUISITES: Before implementing this sample, you must have set up a Sitefinity renderer application and connect it to your Sitefinity CMS application.
For more information, see Install Sitefinity in ASP.NET Core mode.

NOTE: The instructions in this sample use Visual Studio 2022 and a Sitefinity renderer project named Renderer.

Secure the communication between the Renderer and Sitefinity CMS

You can restrict the web service in Sitefinity CMS to deny access to other clients except for the Renderer. You do this by creating an API key for the service in Sitefinity CMS and then adding the same key in the appsettings.json file of the Renderer in the following way:

"Sitefinity": {
"Url": "https://yoursitefinitywebsiteurl",
"WebServicePath": "api/default",
"WebServiceApiKey": "mysecret",
},

With this configuration, when API calls are made to the OData service under the api/default route, a special header will be passed carrying this API key and allowing the call through. This does not authenticate the call, and the user is still left anonymous.

Folder structure

Under your Renderer project, you must create the following folders:

  • Dto
  • ViewComponents
  • Views/Shared/Components/SitefinityData

Create the DTO

  • In the context menu of folder Dto, click Add » Class…
  • In Name, enter Items.cs and click Add.
  • In the class, paste the following code and save your changes:

using Progress.Sitefinity.RestSdk.Dto;
namespace Renderer.Dto
{
public class Item : SdkItem
{
/// <summary>
/// Gets or sets the title.
/// </summary>
public string Title { get; set; }
/// <summary>
/// Gets or sets the Thumbnail.
/// </summary>
public Image[] Thumbnail { get; set; }
}
/// <summary>
/// The image view model.
/// </summary>
public class Image
{
/// <summary>
/// Gets or sets the thumbnail url.
/// </summary>
public string ThumbnailUrl { get; set; }
}
}
view raw Item.cs hosted with ❤ by GitHub

Create the widget

  • In the context menu of folder ViewComponents, click Add » Class…
  • In Name, enter SitefinityDataViewComponent.cs and click Add.
  • In the class, paste the following code and save your changes:

using Microsoft.AspNetCore.Mvc;
using Progress.Sitefinity.AspNetCore.ViewComponents;
using Progress.Sitefinity.RestSdk.Dto;
using Progress.Sitefinity.RestSdk;
using System.ComponentModel;
namespace Renderer.ViewComponents
{
/// <summary>
/// The view component for accessing Sitefinity data.
/// </summary>
[SitefinityWidget]
public class SitefinityDataViewComponent : ViewComponent
{
private readonly IRestClient restClient;
/// <summary>
/// Initializes a new instance of the <see cref="SitefinityDataViewComponent"/> class.
/// </summary>
/// <param name="restClient">The rest service.</param>
public SitefinityDataViewComponent(IRestClient restClient)
{
this.restClient = restClient;
}
/// <summary>
/// Invokes the view component.
/// </summary>
/// <param name="context">The view component context.</param>
/// <returns>The view component result.</returns>
public async Task<IViewComponentResult> InvokeAsync(IViewComponentContext<SitefinityDataEntity> context)
{
var viewModels = await this.GetItems(context.Entity);
return this.View(viewModels);
}
public async Task<IList<SdkItem>> GetItems(SitefinityDataEntity entity)
{
// when using the OData client, the url is automatically prefixed with the value of web the service and the sitefinity instance url
// it uses an expand the get the related image
// for more complex queries checkout the REST SDK official documentation
var getAllArgs = new GetAllArgs
{
// required parameter, specifies the items to work with
Type = RestClientContentTypes.News
};
// optional parameter, specifies the fields to be returned, if not specified
// the default service response fields will be returned
getAllArgs.Fields.Add("Title");
// specifies the related fields to be included in the response (like related data or parent relationships)
if (!entity.HideImage)
getAllArgs.Fields.Add("Thumbnail");
var response = await this.restClient.GetItems<SdkItem>(getAllArgs);
return response.Items;
}
}
/// <summary>
/// The entity class.
/// </summary>
public class SitefinityDataEntity
{
/// <summary>
/// Gets or sets a value indicating whether to hide the related image.
/// </summary>
[DisplayName("Hide related image")]
public bool HideImage { get; set; }
}
}

  • In the context menu of folder Views/Shared/Components/SitefinityData, click Add » Class…
  • Select Code File.
  • In Name, enter Default.cshtml and click Add.
  • In the class, paste the following code and save your changes:

@using Progress.Sitefinity.RestSdk.Dto
@model IList<Progress.Sitefinity.RestSdk.Dto.SdkItem>
<h1>News items</h1>
@foreach (var item in this.Model)
{
<ul>
<li>
@(item.GetValue<string>("Title"))
@{
string thumbnailUrl = null;
if (item.TryGetValue<SdkItem[]>("Thumbnail", out SdkItem[] thumbnails) && thumbnails.Length > 0)
{
thumbnailUrl = thumbnails[0].GetValue<string>("ThumbnailUrl");
}
}
@if (thumbnailUrl != null)
{
<img src="@thumbnailUrl" />
}
</li>
</ul>
}
view raw Default.cshtml hosted with ❤ by GitHub

Build your solution.

Result

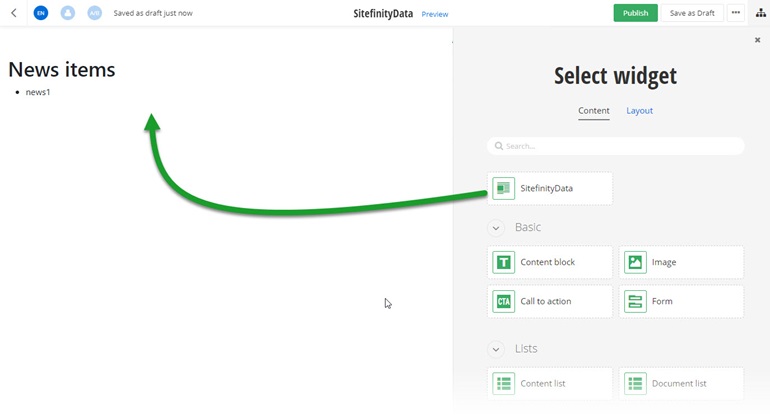
When you open your Renderer application and open the New editor, you will see the SitefinityDta widget in the widget selector. When you add the widget on your page, you can see News items displayed from Sitefinity CMS.
SitefinityData

Run the sample

This sample is available in Sitefinity’s GitHub repository. You can run and play with it.
To do this, perform the following:

  1. Go to Sitefinity’s GitHub repository Sitefinity ASP.NET Core samples.
  2. Expand Code and click Download ZIP.
  3. Extract the files on your computer.
  4. In the extracted folder, navigate to sitefinity-aspnetcore-mvc-samples-master/src/sitefinity-data folder.
  5. Open the sitefinity-data.sln in Visual Studio.
  6. Open the appsettings.json file.
  7. In section “Sitefinity”, change the “Url” property to the URL of your Sitefinity CMS site.
    If you have deployed Sitefinity CMS on the IIS, point to “https://localhost:<https_port>".
  8. In Visual Studio, in the context menu of sitefinity-data project, click View in Browser.
  9. Log in to your Sitefinity CMS instance and place the widget on a page.

Want to learn more?

Increase your Sitefinity skills by signing up for our free trainings. Get Sitefinity-certified at Progress Education Community to boost your credentials.

Get started with Integration Hub | Sitefinity Cloud | Sitefinity SaaS

This free lesson teaches administrators, marketers, and other business professionals how to use the Integration hub service to create automated workflows between Sitefinity and other business systems.

Web Security for Sitefinity Administrators

This free lesson teaches administrators the basics about protecting yor Sitefinity instance and its sites from external threats. Configure HTTPS, SSL, allow lists for trusted sites, and cookie security, among others.

Foundations of Sitefinity ASP.NET Core Development

The free on-demand video course teaches developers how to use Sitefinity .NET Core and leverage its decoupled architecture and new way of coding against the platform.

Was this article helpful?