Custom workflow
Overview
Sitefinity CMS empowers you to extend the built-in workflow process by creating custom workflows. Using this approach you can fit the workflow to your organization's needs. The purpose of this article is to cover the process of creating custom workflows for built-in content types or custom content types derived from Sitefinity CMS content. To extend the build in workflows you can get the default ones from the Sitefinity CMS GitHub repository.
Extend workflows
Sitefinity CMS uses 4 different workflows for its built-in content types:
- PagesApprovalWorkflow.xamlx for pages
- AnyContentApprovalWorkflow.xamlx for content such as News, Events, Blog posts, Lists
- AnyMediaContentApprovalWorkflow.xamlx for media content such as Images, Videos, and Documents
- ApprovalWorkflow.xamlx for dynamic content types created with the Module Builder
Depending on the content for which you want to extend the workflow process you must edit the necessary workflow file. For the purposes of this article we will extend the AnyContentApprovalWorkflow.xamlx file and apply it to NewsItem type.
Project preparation
Open your Sitefinity CMS project in Visual Studio. You can either put the custom workflow file in Sitefinity CMS project itself or build it in code library project and reference it in the Sitefinity CMS project, here we will use the latter approach. Create a new code library project in your solution. Add the AnyContentApprovalWorkflow.xamlx file and set its Build Action to Embedded Resource.
IMPORTANT: The custom workflow .xamlx files must be located in the App_Data folder. For example, ~/App_Data/Workflows/AnyContentApprovalWorkflow.xamlx
Create custom workflow activities
In order to create a workflow activity we need to implement CodeActivity class or one of its derived classes. The activity we are going to create will check news items sent to be published, if their author field is not set the activity is going to populate it with the first and last names of the user sending the item for publish. All logic for this is added to the Execute method of the activity. This method accepts as a parameter the workflow context from which we can extract the item going through workflow and the user publishing it. Sample code bellow:
Add activities to workflows
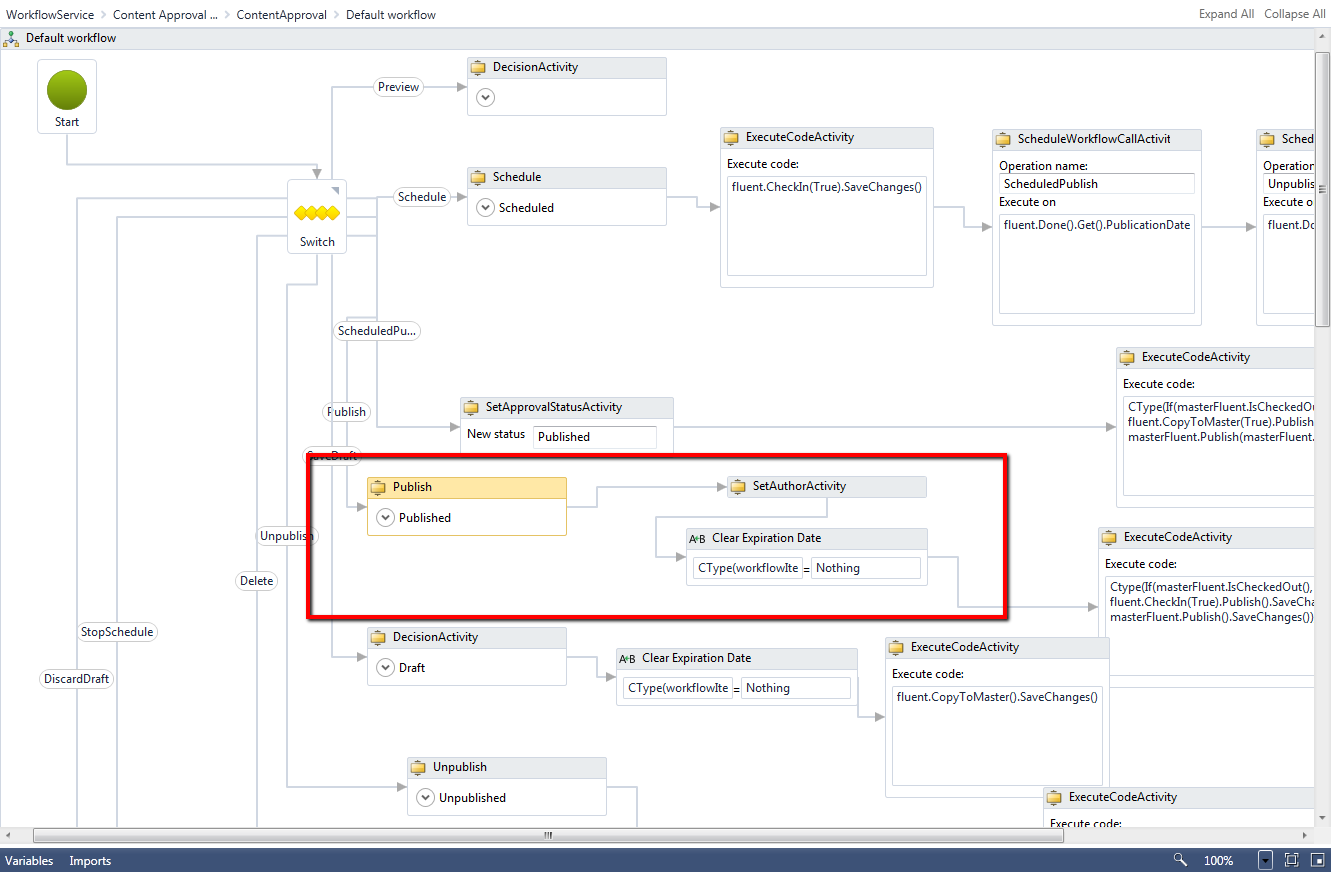
If the activities are part of the same project as the workflow file, they will be automatically added Visual Studio's toolbox for workflow activities. Open the workflow file for edit and go to ContentApproval. There you can see that the process branches depending on the active approval process for the particular content type. Choose the case in which you want to execute the custom code activity:
- Default workflow is used when there is no approval workflow enabled
- One Level Approval Workflow is used when there is just one step in the enabled approval process
- Two Levels Approval Workflow is used when there are two steps in the enabled approval process
- Three levels Approval Workflow is used when there are three steps in the enabled approval process
To keep it simple we will add the activity to the Default workflow after the Publish activity. When this operation the workflow should look as below:

The workflow is now extended. The project can be build and its assembly added to the bin folder of the Sitefinity CMS project.
Register the custom workflows
You can register the custom workflows through the Sitefinity CMS advanced settings. If the workflow is embedded in an assembly first you need to create a Virtual Path for it.
Create virtual path for embedded workflows
To create a Virtual Path go to Adminsitration -> Settings -> Advanced -> VirtualPathSettings -> Virtual paths and create a new Virtual Path. Configure the following properties:
| VirtualPath |
The application relative path you want to use for the workflow.
E.g. ~/SfSamples/AnyContentApprovalWorkflow.xamlx
|
| ResourceLocation |
The embedded resource path to the XAMLX file.
E.g. Telerik.Sitefinity.Samples.Workflow.Workflows.AnyContentApprovalWorkflow.xamlx, Telerik.Sitefinity.Samples.Workflow
|
| ResolverName |
EmbeddedResourceResolver |
Save the changes
Set content types to use custom workflows
To make a content type use a custom workflow you have to set this in the Workflow configuration editor. Go to Administration » Settings » Advanced » Workflow » Workflows and find the type for which you want to use custom workflow, e.g. Telerik.Sitefinity.News.Model.NewsItem. Open this entry for edit and set the ServiceUrl property to the application relative path to the workflow file. If you have used an embedded file use the virtual path you have created for it, e.g. ~/SfSamples/AnyContentApprovalWorkflow.xamlx. Save changes and restart the website. If you have previously activated approval workflow for this item you need to deactivate it and activate a new one to use the custom workflow.