Tax calculation
Logic of creating taxes
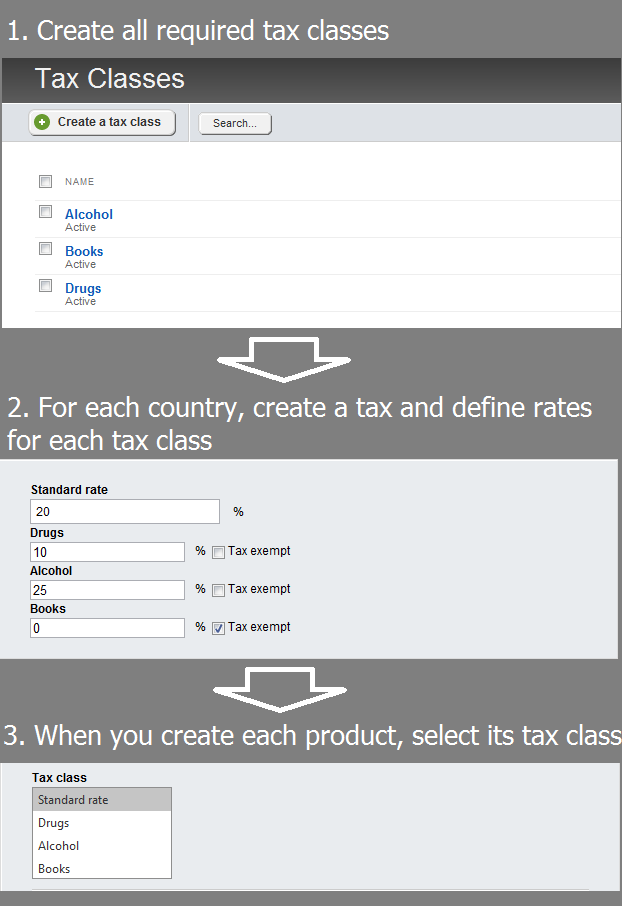
You start defining taxes by first creating the tax classes, then the taxes, then select a tax class for each product. The following represents this process:

Tax classes
Tax classes are a way to group taxes in different categories that will be later assigned to different taxes. On Tax classes page, you create all the tax classes that are required for your store. For example, if in India there is a lower tax applied to drugs, you must create a tax class Drugs and you will later define its rate when you create the tax for India. For each country you apply only tax classes relevant to this country, but you create all tax classes in advance on Tax classes page. If you do not define any tax classes, when you create taxes, you will only enter the standard tax rates for each country.
Taxes
For each country that you will ship items to, you must define a tax that is applied to those items. You can have only one tax per country. When you create the tax, you will also see all the tax classes that you have created. You must fill all fields, no matter whether a tax class defers from the standard or not.
NOTE: If in a country a tax class is not different from the standard tax, when you define the tax class rate for this country, you enter the standard rate. For example, if in the UK, books have a lower than the standard rate, you define a tax class books, which is then applied when a book is delivered to the UK. If in Morocco books are not taxed with a lower tax rate, when you define the tax that applies for Morocco, in Books, you enter the same rate as the standard.
Products
When you create a product, you only choose which tax class it belongs to. If you do not select a tax class the product is taxed with the standard rate for the country. You do not choose any rates, because you do not know which country the customer is from.
Logic of applying taxes
When you create a tax class, you select whether it is based on shipping or on billing address. The system uses the following logic to calculate and apply a tax to a product:
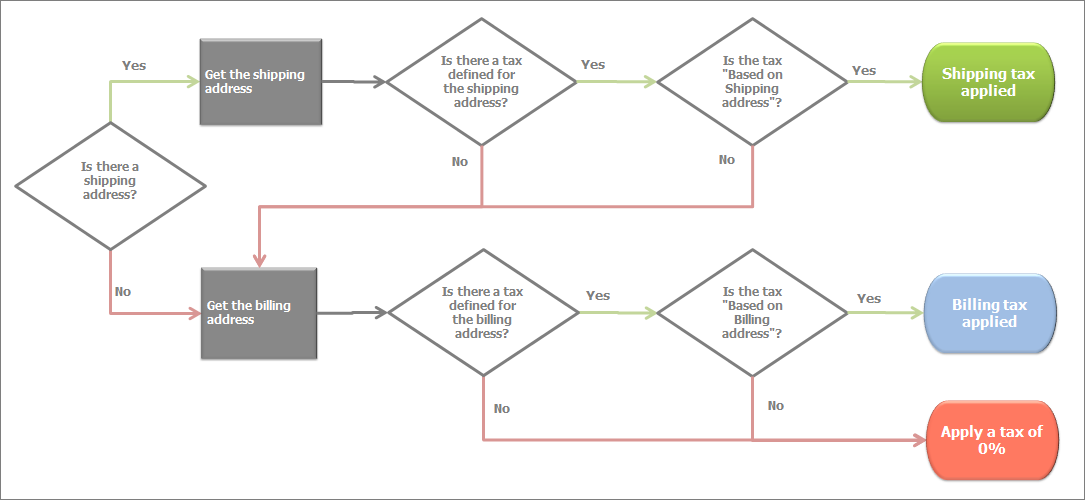
- The system checks the shipping address of the customer.
For the shipping address of the customer the system tries to find a matching tax among the taxes you have created. The system searches only the taxes that are based on shipping address. You select whether a tax is based on shipping or on billing address when you create the tax. - If there is no tax created for the shipping address of the customer, the system checks the billing address of the customer.
For the billing address of the customer the system tries to find a matching tax among the taxes you have created. The system searches only the taxes that are based on billing address. - If there is no tax created for the billing address of the customer, the system uses 0% tax in the calculation.
The following flowchart depicts the process:

NOTE: If the products are of Product types, for which you have defined that it contains non-shippable items, when the customer checks out, it is required to fill out the billing address only. Therefore, a customer who checks out software does not have a shipping address. If, however, the customer’s order contains both shippable and non-shippable products, the customer has a shipping address and is taxed with the tax for the shipping address, if it exists.
Applying tax classes
If a matching tax is found, then for each product in the cart, the system finds the tax class it belongs to. Then the tax that you have defined for this tax class is applied to the product. All products that do not belong to a particular tax class are taxed with the standard tax rate.
Logic of displaying taxes
You can choose different ways to display taxes on your website.
For more information, see Administration: Store settings » Tax.
Logic of applying tax to shipping cost
When you create a tax, you can select whether to apply the tax to the shipping chipping cost. If you choose to apply tax to the shipping cost, the tax that is applied is determined the same way as in Logic of applying taxes above.